In this tutorial, we will create a retro styled rocket in Photoshop. We will explore the importance of details in creating a complex illustration, as well as how to create realistic surfaces.
Moreover we will look into the process of using layer masks and how effectively they can control your artwork in a non-destructive way. You’ll also learn how to manage your project when working with many layers and many more time saving tricks. So let’s start!
What You’ll Be Creating:
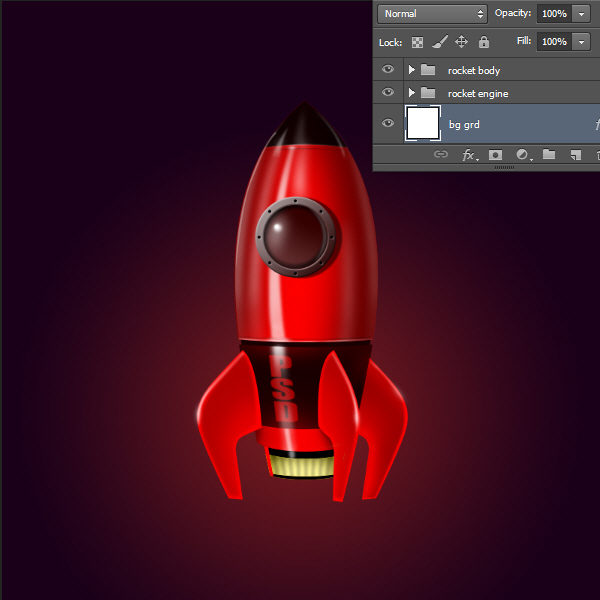
Here’s a look at the outcome you’ll be able to produce by the end of this lesson:
Step 1
Open a new file in Photoshop with the following settings and save as Retro Rocket.psd. During work always remember to frequently press Control + S to save and update the file.

Step 2
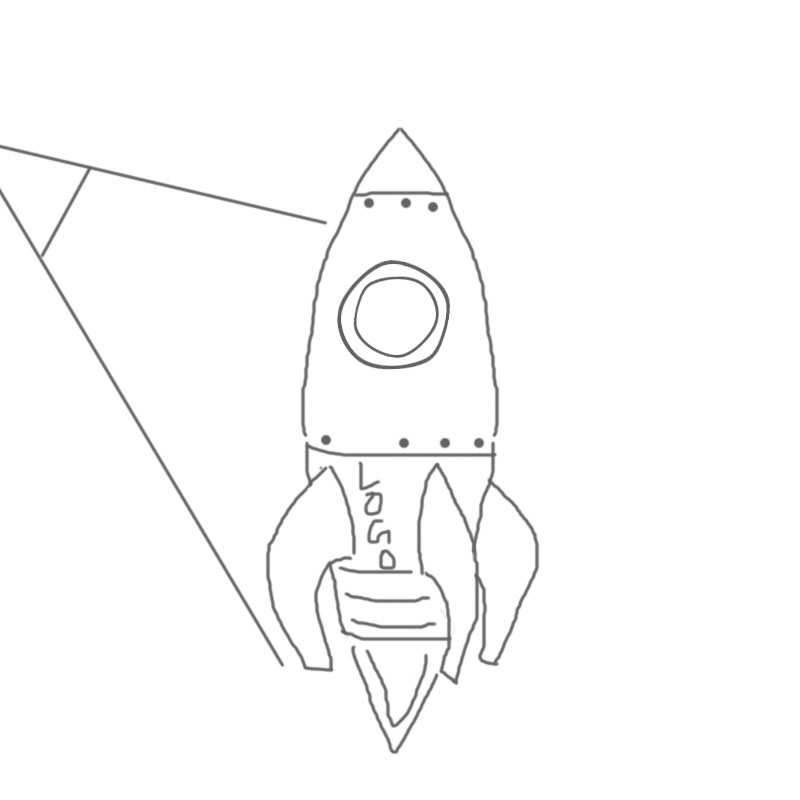
First let’s take a look at the concept image of this tutorial. It’s is a very rough sketch, but the purpose is to have a basic idea. There is a strong light source from left. So the highlights of the rocket are mostly left facing. But at right side we also create some subtle highlights due to diffuse light.
Step 3
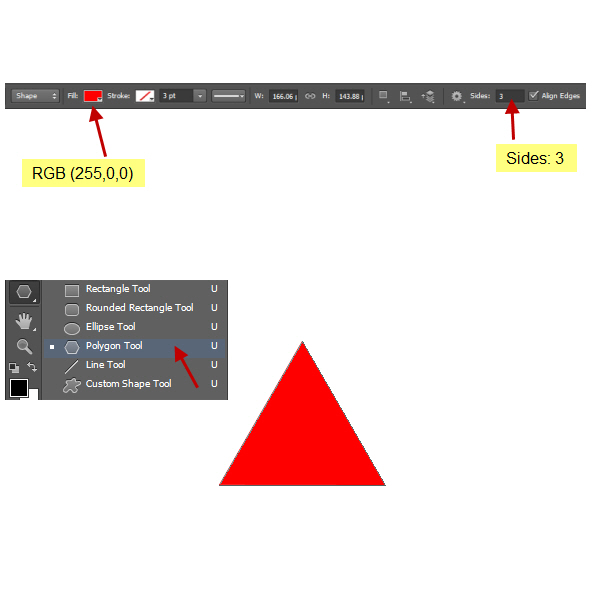
Back in the Retro Rocket.psd file select the Polygon tool from the Toolbox. Then in the Options Bar select Shapes and at the right end in the Sides Field type 3. Now drag a triangle with the color red (RGB 255, 0, 0), using the following settings:
Step 4
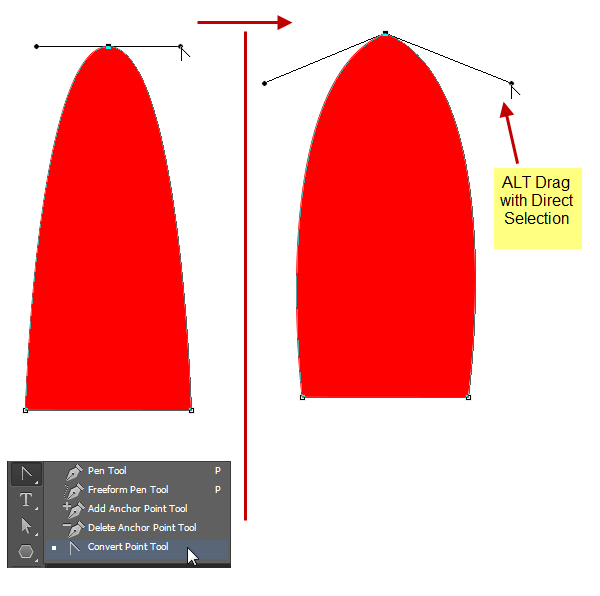
Select the Direct Selection Tool (White arrow), then select and drag the top anchor point of the triangle upwardly making the triangle taller. Now we have to change the sides of the triangle from straight lines to curves. We will do this with Convert Anchor Point Tool.

Step 5
Select the Convert Anchor Point Tool from the Path Creation Tools group (looks like an inverted “V”). Then click and drag on the top anchor point to extend the Direction Points. To move the handles (i.e. Direction Lines) individually, press the ALT key and drag the Direction Points. Direction Points are the solid circles or dots at the end of the Direction Lines. This will create the pointed looking rocket shape. Rename this shape layer to “rocket body top”.
Step 6
Select the Rectangle Tool and create a rectangle below the previous shape. This will create a new shape layer below the “rocket body top” shape layer. Name this layer as “rocket body dn”. Following the previous process select the Convert Anchor Point Tool and change the rectangle to match the below screenshot. We are basically dividing the rocket body into two shape layers, i.e. “rocket body top” and “rocket body dn”. We are working this way, because there is a groove in the middle of our rocket design. Notice there are three straight lines. One straight line in the “rocket body top” layer and two in the “rocket body dn” layer. Change them into curves by using the same techniques. Make sure that their curve amount is equal. This will give the rocket a more 3d perspective.

Step 7
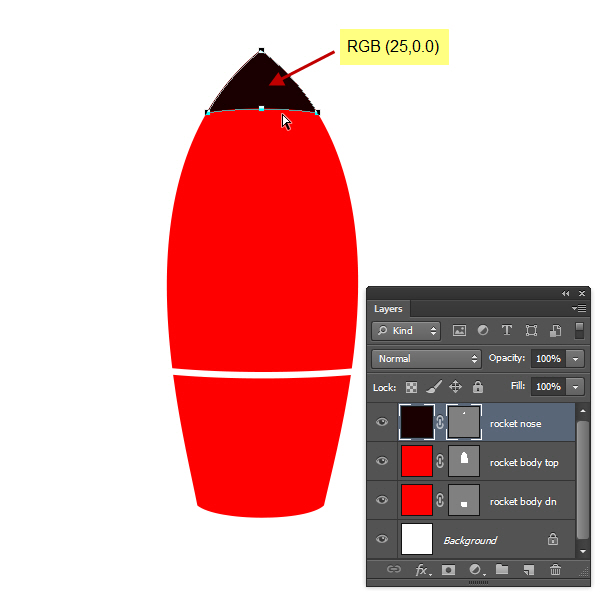
Create one more triangle with the Polygon Tool on top of the “rocket body top” layer and name it “rocket nose”. The color will be black with a slight red tint (RGB 25, 0, 0). Match the size of the triangle to the top of the rocket body by moving the Anchor Points with the Direct Selection tool. Then bend the lower straight line with the Convert Anchor Point Tool. The direction of the curve should be upwards.
Step 8
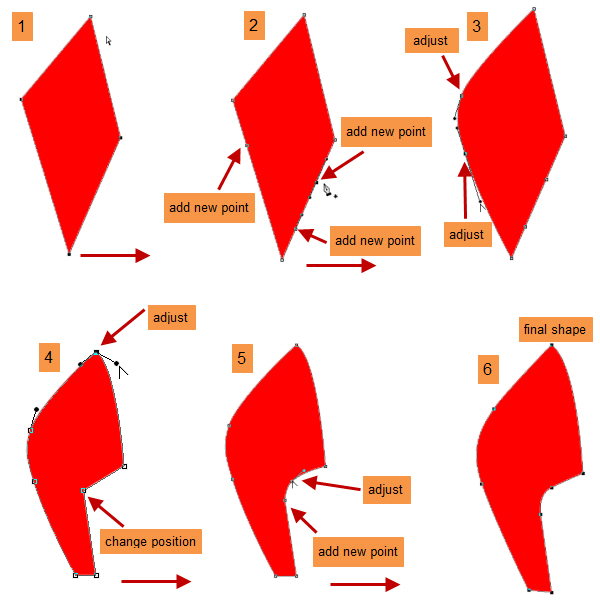
It’s time to create the wings or the three stand like structures on top of which our rocket stands. They are also used for direction and balance during flight. We will start with a rectangle shape layer and edit the Anchor Points to change the shape into a wing shape. For this we will use the same Direct Selection Tool and Convert Anchor Point Tool based process. Let’s review the process once more.
We create the shape either with shape tool like rectangle or with the Pen tool. Then edit Anchor Points with Direct Selection tool. For creating curves we change the Anchor Point type from corner to smooth with the Convert Anchor Point Tool. Smooth points are those with extended lines (i.e. Direction Points) from both sides of the Anchor Points. The Direction Points controlling the height and direction of the curves. To add Anchor Point, click on any empty portion of the path with Pen Tool. To delete, click on any existing Anchor Point with the Pen Tool. Working with Pen Tool or editing paths are itself complicated subjects, which is beyond the scope of this tutorial. But the above discussion should help you to start your journey with path editing. I hope that the process of shape editing as well as Anchor Point editing is clear now.
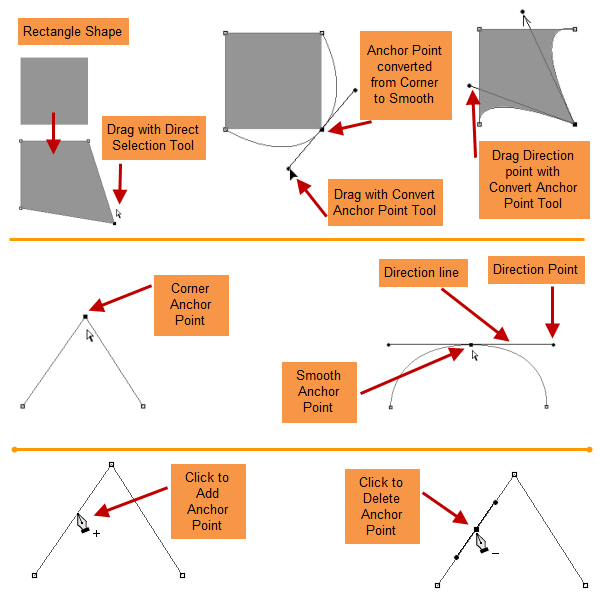
Follow the screenshot below for a basic idea of how you can change a rectangular shape to the wing shape. As this is a trial and error process, expect to spend some time here. When you are satisfied with the wing shape then change the layer name to “wing left” by double clicking on the text of the shape layer.
Step 9
Right click on the “wing left” layer and select Duplicate Layer. Then change the position to the right side of the rocket and rename the layer to “wing right”. Now select the Path Selection tool (black arrow) and click on the path to select it. Then press Control + T to get the bounding box around the selected path. Now right click within the bounding box and select Flip Horizontal from the menu.

Layer “wing right” after flipped and positioned.

Step 10
Duplicate the “wing right” layer and rename the new layer to “wing mid”. Now edit the Anchor Points to create the middle wing just like before.

Step 11
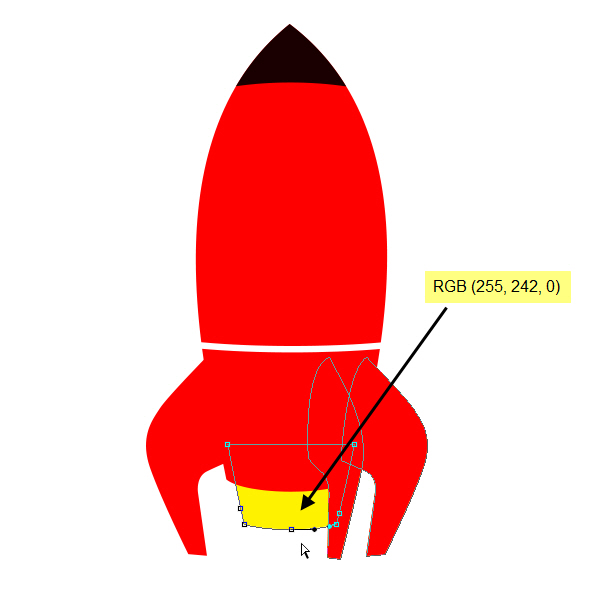
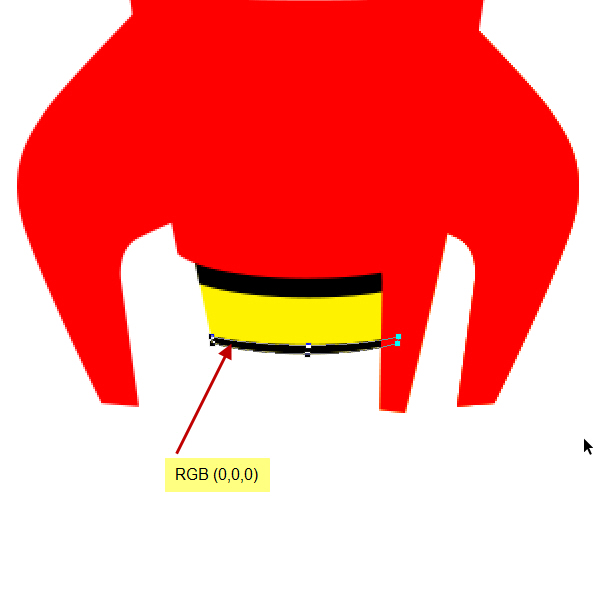
Follow the same technique and create a yellow (RGB 255, 242, 0) color rectangle shape layer below the “rocket body dn” layer. Change the shape like the screenshot below. Name this layer as “engine mid”. Let’s create two more parts of this engine.
Step 12
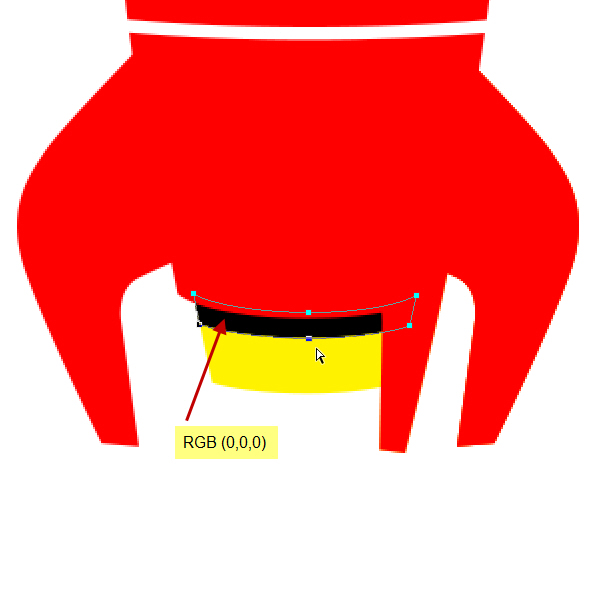
Create another rectangle shape layer (RGB 0, 0, 0) with upper and lower sides curved on top of “engine mid” layer and name it to “engine upper”. Position this shape on top of the middle part of the engine.
Step 13
Duplicate the “engine upper” layer and position it on the lower part of “engine mid” layer. Name this layer to “engine lower”. What we have done basically is to create the three parts of the engine. Think of the middle part of the engine as it is fitted within two rings. The Top ring is “engine upper” and bottom one is “engine lower”. Both “engine upper” and “engine lower” are black in color, while the middle part is yellow in color.
Step 14
Now we will create the left side of the engine. This is actually an extended part of the rocket body (“rocket body dn” layer). So create another red (RGB 255, 0, 0) color rectangle position like the screenshot below. Name it to “engine left side”. Change the position of this layer below “rocket body dn” layer. You can always change the layer order by dragging up or down in the Layers Panel.

Step 15
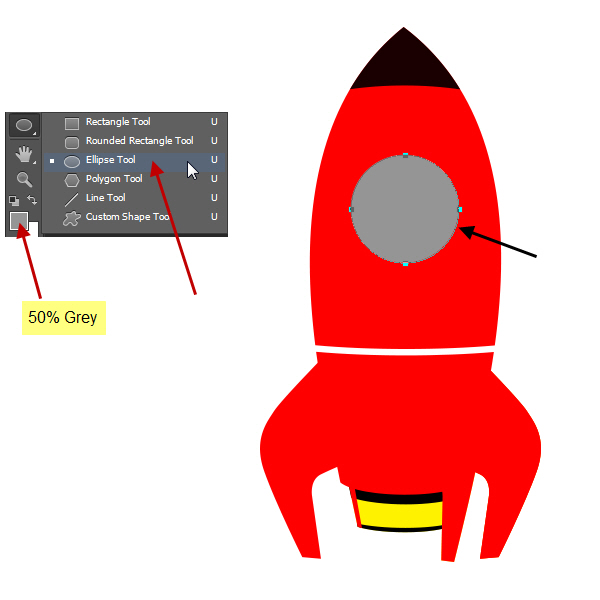
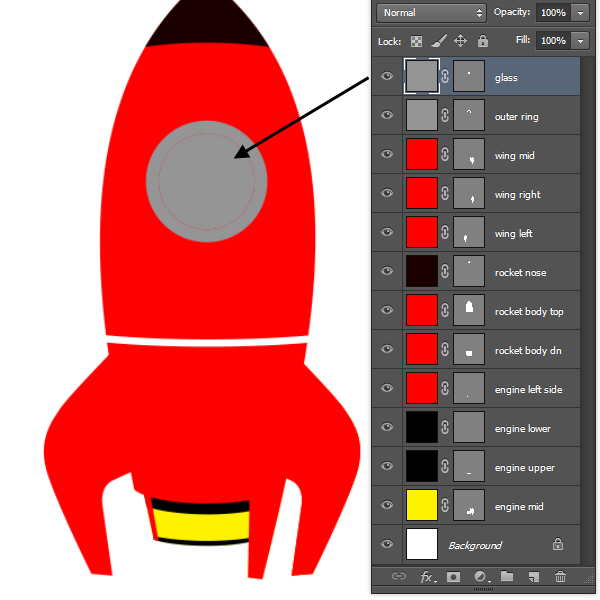
Now change the Foreground color to RGB (149, 149, 149) from below the Toolbox. Select the Ellipse Tool and create a circle like the screenshot. You can create a perfect circle by pressing the Shift key while dragging.
Step 16
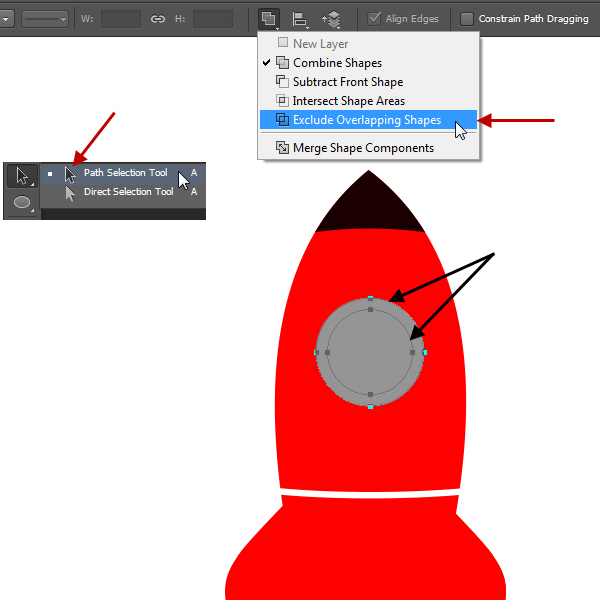
Select the circle with the Path Selection Tool, then Edit > Copy and Edit > Paste. So we have now two shapes within the same shape layer. Select these two circles with the Path Selection Tool by Shift clicking method i.e. select one path and Shift click on another. When any path is selected then Shape Options appear in the Options Bar on top. Select the option Exclude Overlapping Shapes.
Step 17
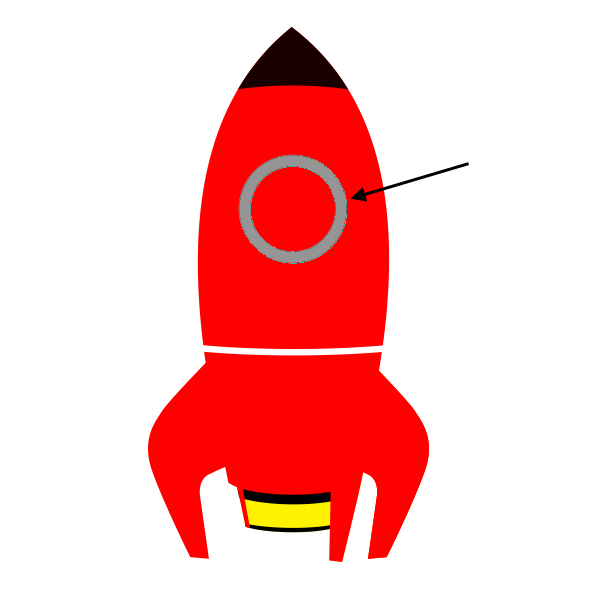
This will produce a ring shape. Rename this layer to “outer ring”.
Step 18
Create another circle layer on top of the “outer ring” layer with the name “glass”. Match the size of “glass” layer circle with the inner circle of the “outer ring” layer.
Step 19
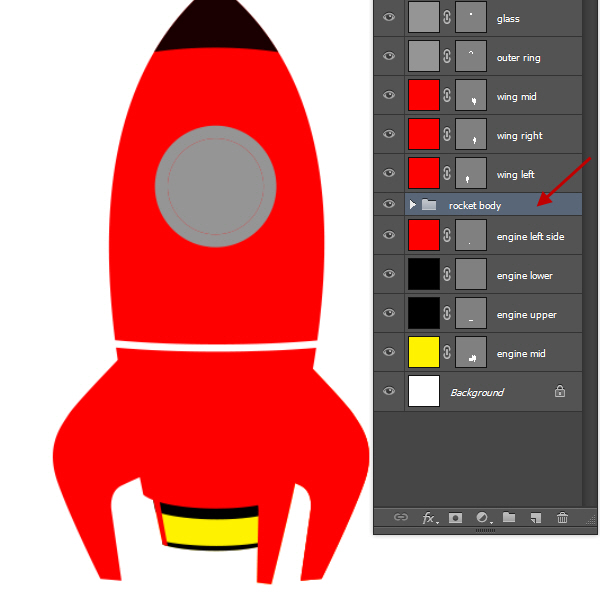
Layers are increasing in the Layers Panel. So it’s time to Group the layers in the Layers Panel. This is a good habit for a project when you are working with many layers. Select the “rocket nose”, “rocket body top” and “rocket body dn” layers. Then click on the panel option of the Layers Panel at the upper right corner. Then select New Group from Layers option.

In the next New Group from Layers Option Box type “rocket body” in the name field and click OK to accept. This will create a Layer Group with the selected layers.
Step 20
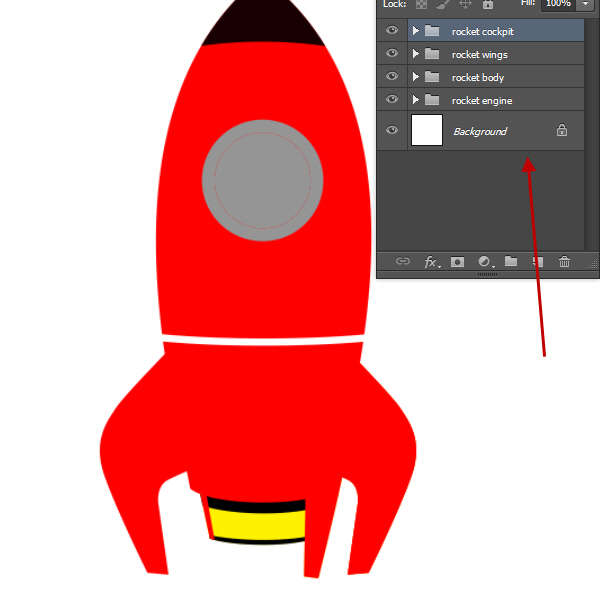
Similarly, create three more groups namely; “rocket engine”, “rocket wings” and “rocket cockpit”. Follow below arrangements:
- Rocket engine group – “engine left side”, “engine lower”, “engine upper” and “engine mid” layers.
- Rocket wings group – “wing left”, “wing mid” and “wing right” layers.
- Rocket cockpit group – “outer ring” and “glass” layers.
Step 21
Now select the “rocket cockpit” group and move a little towards the left side of it. This will give more 3d perspective look.

Step 22
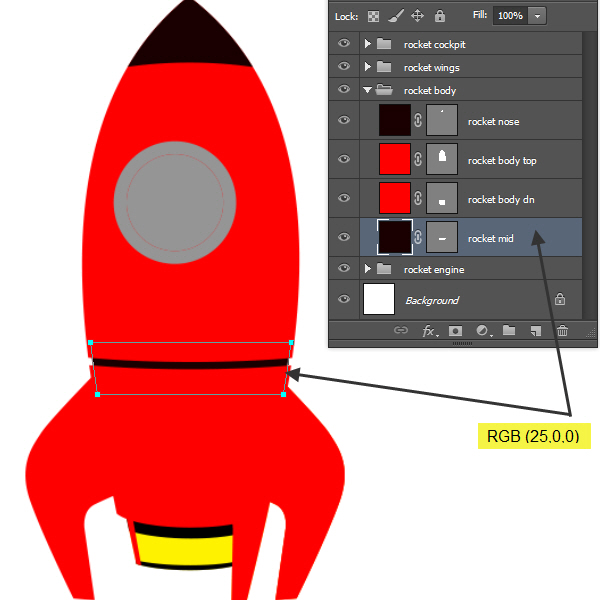
Expand the “rocket body” group by clicking the arrow at the left side of the folder icon. Create a new rectangle shape (RGB 25, 0, 0). Adjust the shape according to the screenshot. With this shape we complete the rocket shape. It’s time for shading and creating the look of the rocket surface.
Step 23
About Shading
Before starting with the shading part lets discuss our general shading workflow for this tutorial. Remember, the shading part is going to be a repetitive process, as we apply the same steps again and again.
Creating Highlights
The technique will be a little different for users of old and new versions of Photoshop. For users of old versions of Photoshop where there is no Properties Panel as well as no Mask Feather option, the process is: create the highlight shape with pen tool; Rasterize it; then apply Gaussian Blur filter and finally create a mask, as well as adjust the layer opacity to control the strength of the effect.
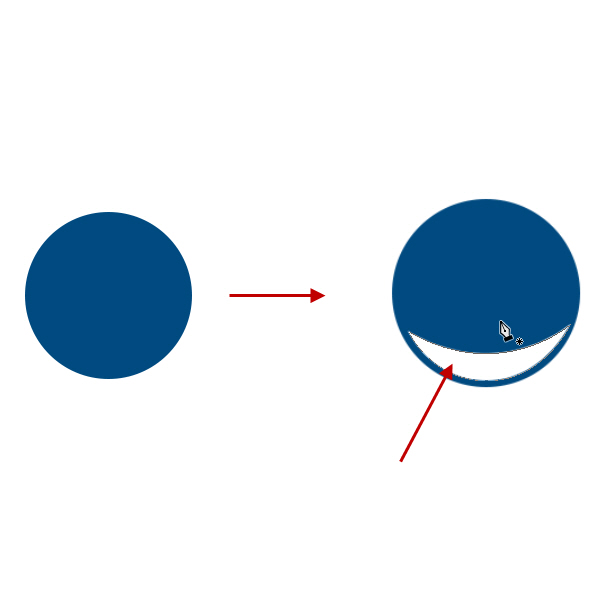

For users of Photoshop CS6 , the steps are: create the highlight shape with pen tool like before but then instead of applying Gaussian Blur filter open the Window > Properties. In the Properties Panel adjust Feather amount, which will produce similar effects like Gaussian Blur. The difference is you can again open the Properties Panel and adjust the previously applied Feather amount. Then adjust the layer opacity as before.
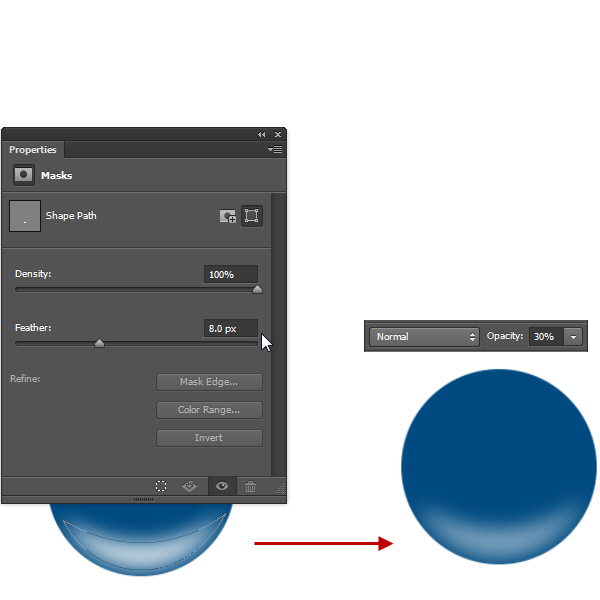
For those, who are using Photoshop CS5, you have to open Window > Mask after selecting the vector mask thumbnail of the shape layer. Then we will add another mask on that layer (i.e. either it is a rasterize layer or a shape layer) to further control the visibility or appearance of the highlight shape.

Another simple technique is: go to the Paths Panel and create a New Path by clicking the New Path Icon from the status bar below. Then create shape with the Pen Tool here and Control on the Path in the Paths Panel to load as a selection. Selection is still active, go back to the Layers Panel and create a new layer. Then fill that selection with a color and deselect. Then apply Gaussian Blur to soften the shape and use mask and layer opacity to control the visibility of the shape.

Yes, I know. A lot of information here! But what I want is you to try all of them then select the process you feel most comfortable with. Then use the same process again and again throughout the tutorial to master it.
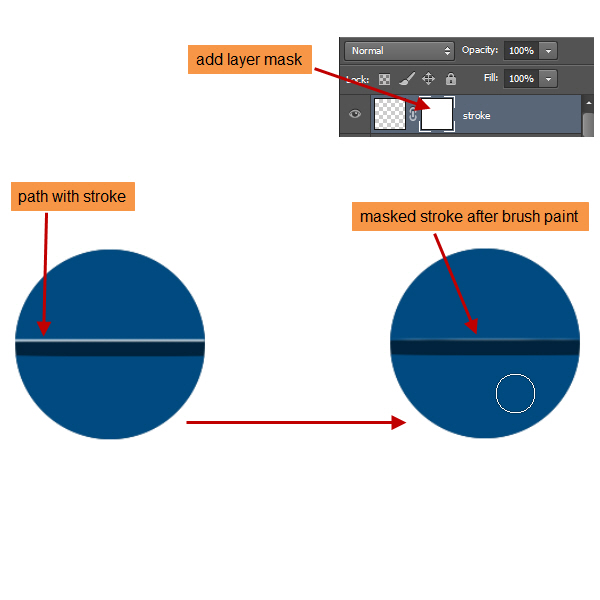
Creating Edge Highlights
Edge highlights are a little different than the general highlights. They are the thin or narrow streaks of bright white areas visible on the edges only. For this, we will create a path (open not closed) running along the edges with the Pen tool and then stroke that path with a small brush. Then use a mask to control the visibility as well as reduce the opacity of that layer to adjust the layer further.

Creating Shadows
Shadows are fairly simple here, as comparing to highlights we don’t have that much amount of shadows to deal with. First we Control click to select the layer. Then we create a new layer on top of that layer and paint with a black brush within the active selection. After that we reduce the opacity of the layer and if needed add a mask to further control the shadow amount.

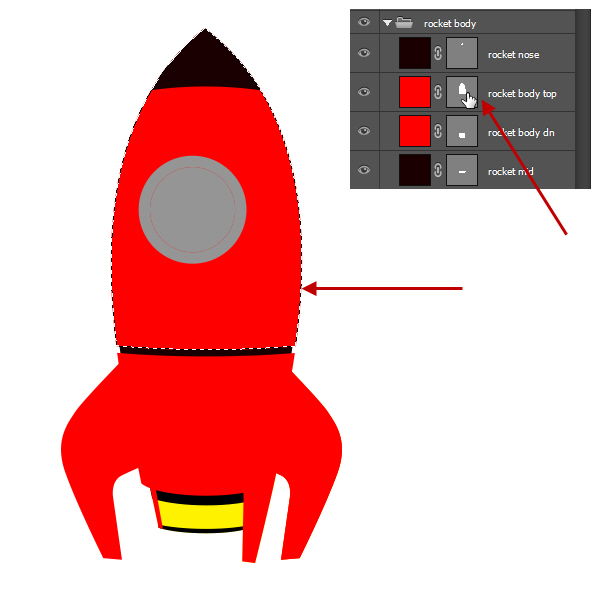
Step 24
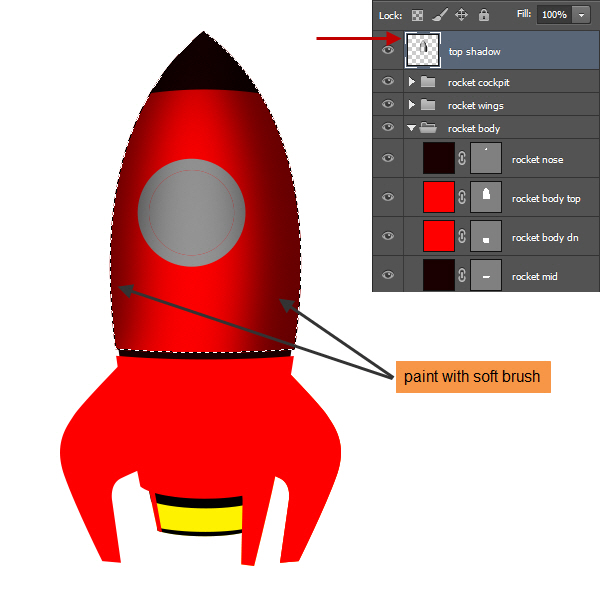
So let’s go back to where we left our rocket project. Expand the “rocket body” group and Control click on the mask thumbnail of the “rocket body top” layer to load the shape as a selection.
Step 25
Create a new layer named “top shadow” on top of it. Then paint both sides of the selection with a large soft brush with black color. Position the brush in such a way that more or less half of the circle of the brush is outside the selection edge. Check screenshot for reference. Now position this “top shadow” layer in between the “rocket cockpit” and “rocket wings” group.
Step 26
Then create a new shape layer with a white color shape like the below screenshot with the Pen Tool. Rasterize it by right clicking on it and then apply two to three pixel Gaussian Blur. You should have something like the below screenshot.
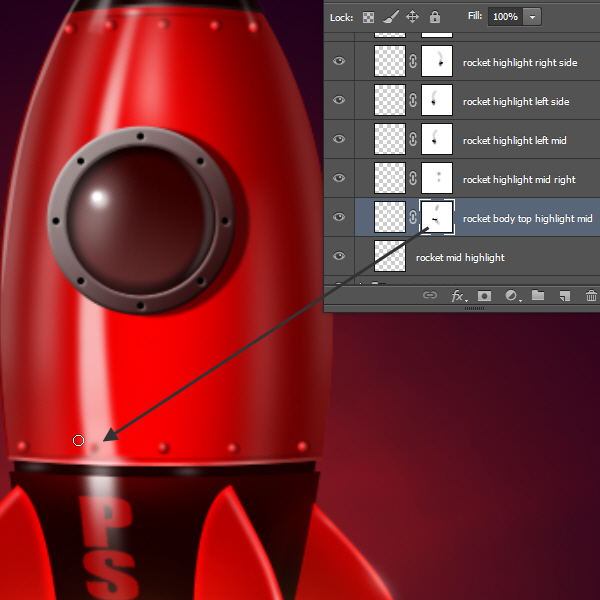
Step 27
Rename the layer as “rocket body top highlight mid” and reduce the layer opacity to 70%. Then apply a mask by clicking the Add Layer Mask icon from below the Layers Panel. Now with soft black color brush, paint within the mask. First, I paint the top and bottom area to hide some part with a soft brush with opacity 100%. Then with a 50% opaque brush, slightly reduce the opacity of the white shape at both top and bottom edges.

Step 28
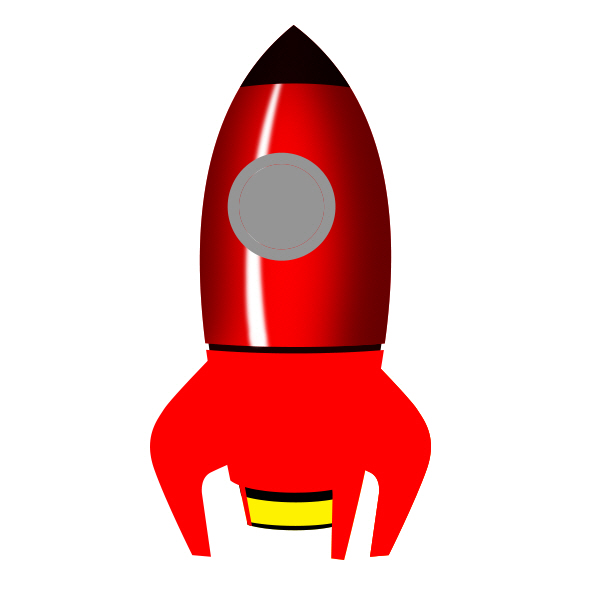
Now create seven more highlight layers on top of “rocket body top highlight mid” layer. Then apply a Gaussian Blur of 6 pixels on all of them.

Six layer names and their corresponding positions.
Step 29
Next change their layer opacity by following the screenshot below. Also check the screenshot for the number of masks I applied on them. Mostly, I painted at the edges and create a gradual opacity reduction by painting with a low opacity brush (30-50%). Remember the exact placement and look is not important. The objective here is to create a series of highlight shapes with variable opacity to show the glossy and reflective nature of the painted surface of the rocket.

Step 30
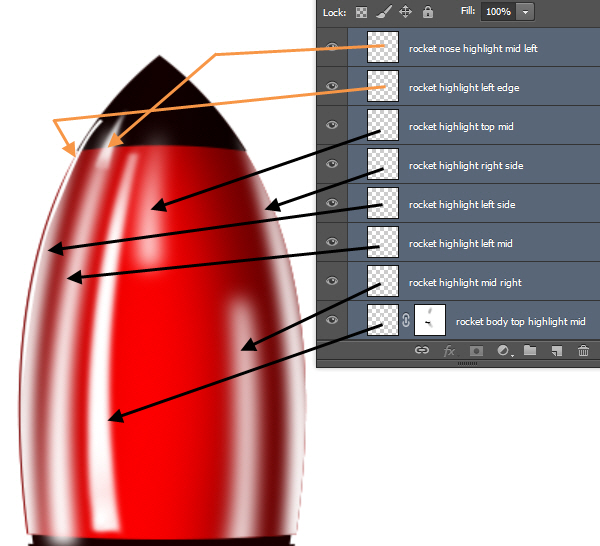
Similarly create three more white color highlight layers for the rocket nose area. Check screenshot for the layer placements and their opacity values.
Step 31
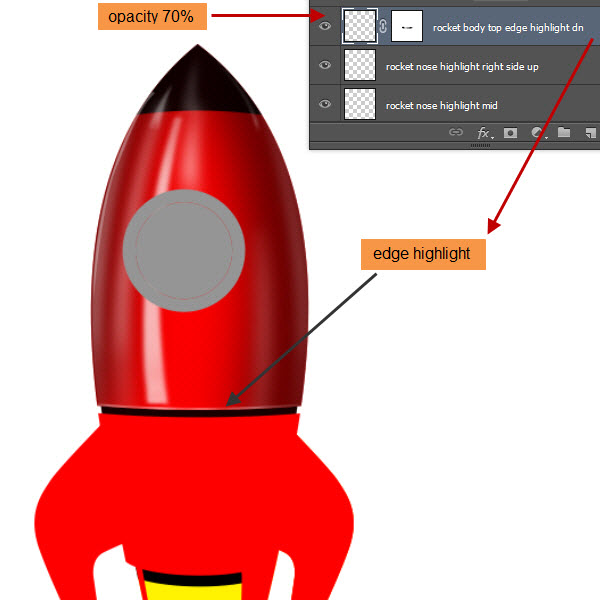
Let’s create our first edge highlight of the rocket body. Create a new layer on top of our last layer, which is “rocket nose highlight right side up” layer. Name this layer as “rocket body top edge highlight dn”. Now select a soft white brush with 1 to 2 pixels radius. Then take the Pen Tool and create an open path along the lower edge of the rocket body top shape. Go to the Paths Panel, target the newly created path and click Stroke Path with Brush icon (second from left) below the Paths Panel. Click any empty area within the Paths palette to deselect the path. Go back to the Layers Panel and add a mask to that “rocket body top edge highlight dn” layer. Paint within the mask with a black brush to hide some portion of the edge highlight. Change the opacity of this layer to 70%.
Step 32
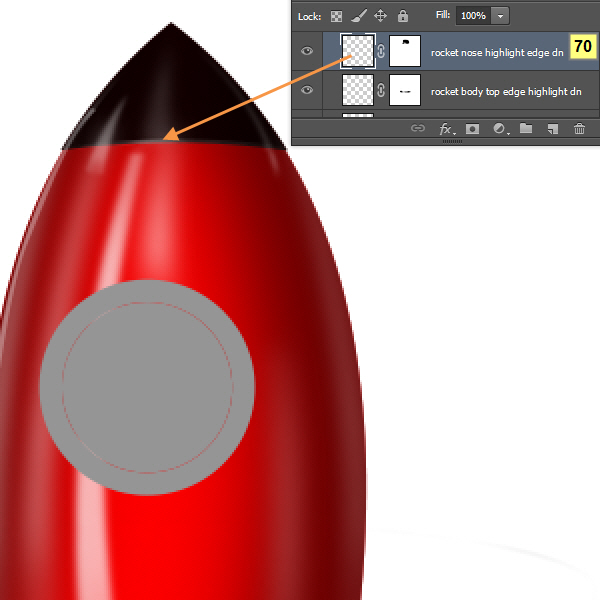
Create a new layer on top of this, named “rocket nose highlight edge dn”. Follow similar process to create a thin highlight on the lower edge of the rocket nose. Here use 1 pixel brush for adding the stroke to the path. After that change the layer opacity to 70%.
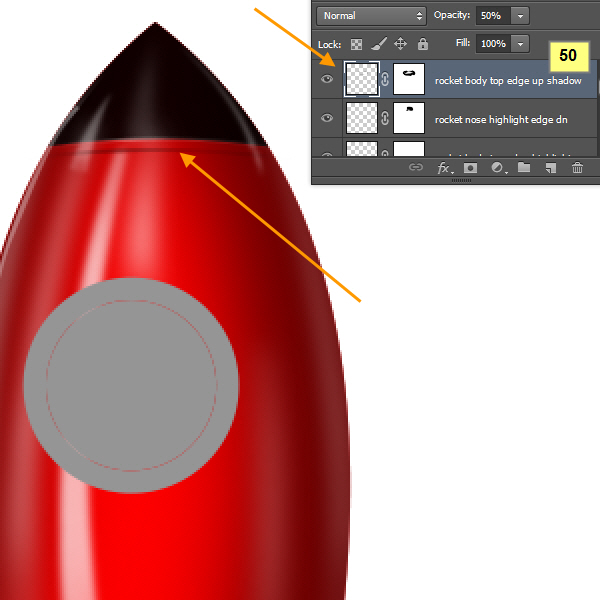
Step 33
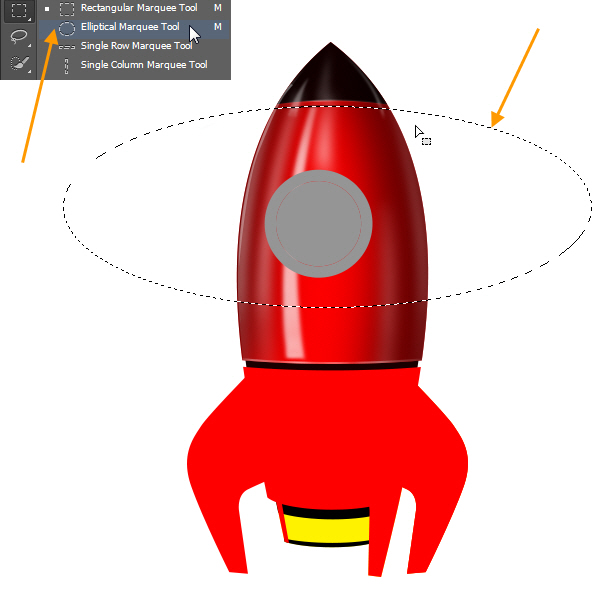
Now we will create two thin shadow lines for rocket body top shape. Later we will place some bolts on top of them. Let’s create the shadow line of the rocket body top upper edge. Create a new layer with the name “rocket body top edge up shadow” on top of “rocket nose highlight edge dn” layer. Select the Elliptical Marquee Tool and drag a large ellipse by matching the lower edge curve line of rocket nose shape.
Then add a 2 pixels black stroke from Edit > Stroke.
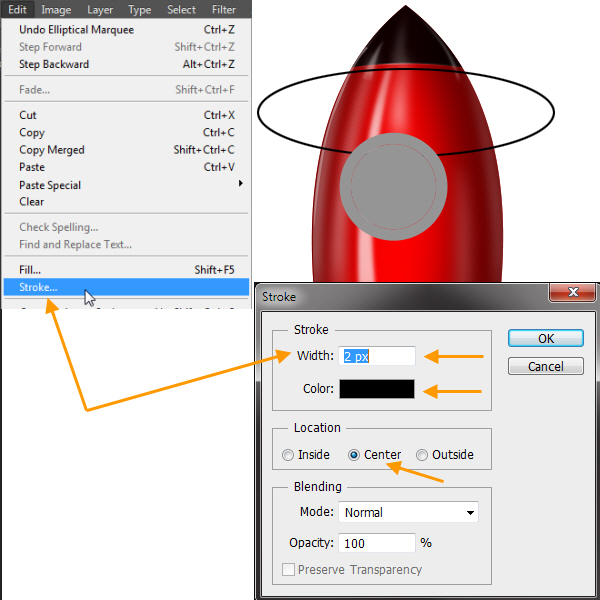
Add a layer mask to the “rocket body top edge up shadow” layer and follow the previous adjustment process like the “rocket nose highlight edge dn” layer mask. Finally, change the opacity of the layer to 50%.
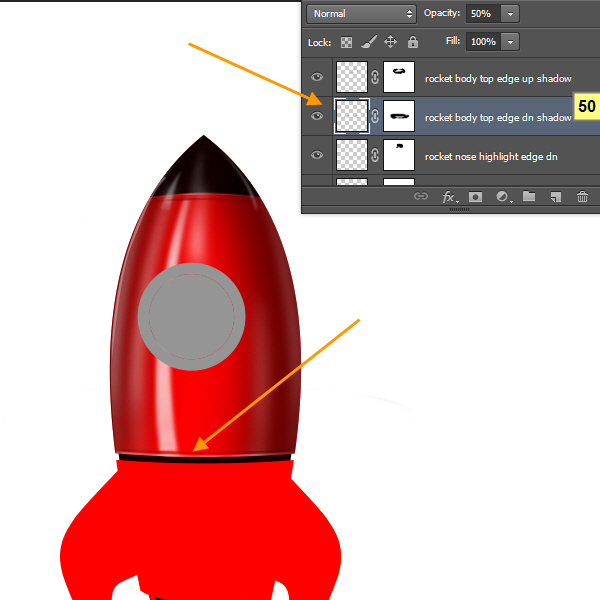
Step 34
Below this layer create similarly “rocket body top edge dn shadow” layer. Opacity of this layer will be 50%.
Step 35
Now on top this two edge shadow layers, we will create two more highlight layer with small white oval shape. Select a white color soft brush, then pres F5 key to open the Brush Panel (or, Window > Brush). Use screenshot for brush settings.

Step 36
Create two new layer with the names “rocket body top highlight edge up mid” and “rocket body top highlight edge dn mid” respectively. Basically we are going to create two small oval highlights on top and bottom of previously created “rocket body top highlight mid” layer. Name of these two layers will be “rocket body top highlight edge up mid” and “rocket body top highlight edge dn mid” respectively. Check screenshot for reference what will be the opacity of both layers.

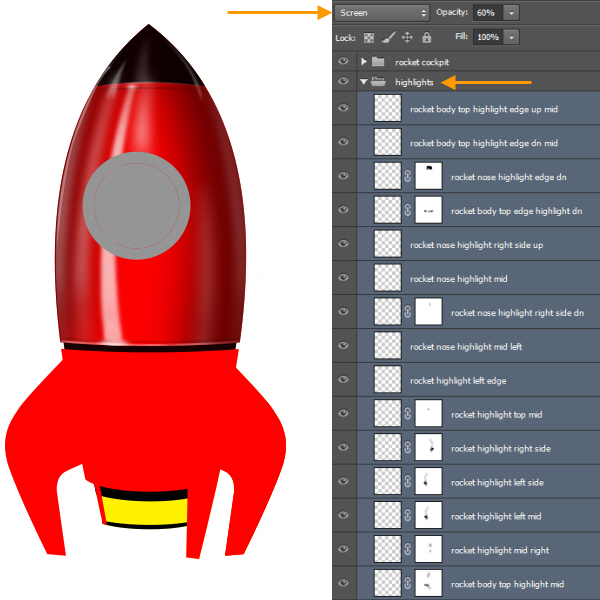
Step 37
Next select all the highlight layers and create a new layer group with the name “highlights”. Another thing you should do is select all highlight layers from within “highlights” group and change the Layer Blend Mode from top of the Layers Panel to Screen. This will make the highlights look a little brighter.
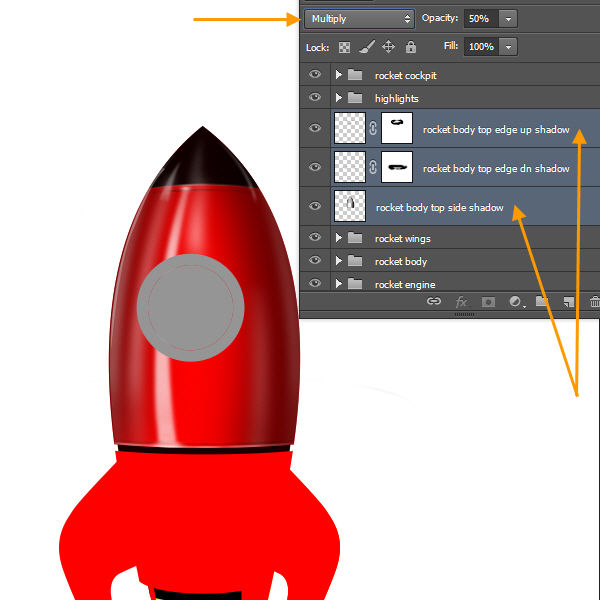
Step 38
Following the same process create a “shadows” layer group with all the shadow layers within it. All shadow layers blend modes will be Multiply.

Step 39
Target the “rocket body dn” layer and double click on the shape layer thumbnail (left side of mask thumbnail) to open the Pick a solid color window. Then change the color to RGB (25, 0, 0) and click OK. Now the color of the rocket body down shape is black with a red tint.
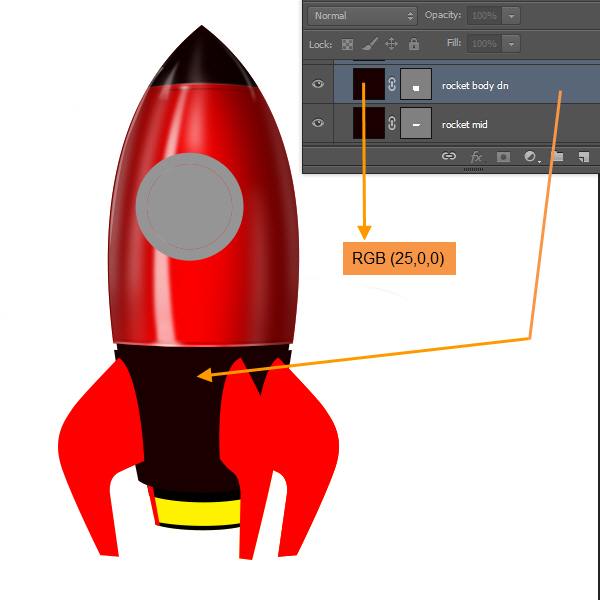
Step 40
Create a new layer with the name “rocket body dn ring” on top of “rocket body dn” layer. Then Control click on the mask thumbnail of the “rocket body dn” layer to load as a selection. Fill this selection with red (RGB 255, 0, 0) color.
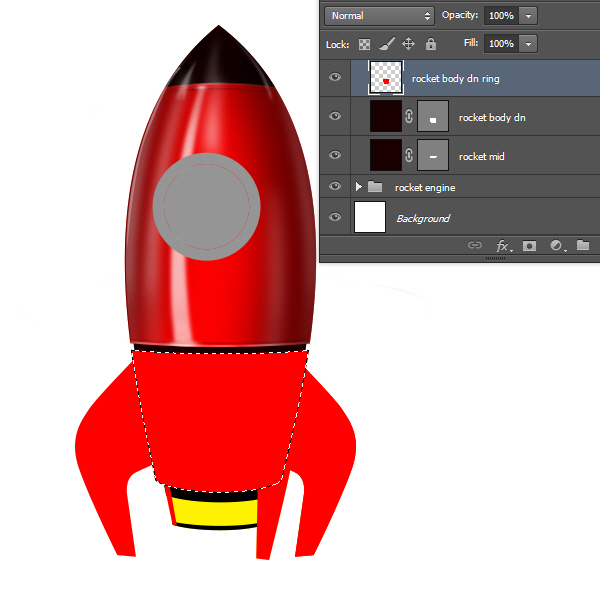
Step 41
Selection still active, change your current tool into any selection tool (example: Rectangular Marquee tool). Then right click within the selection and select Transform Selection.

Move the selection down to match the screenshot below.
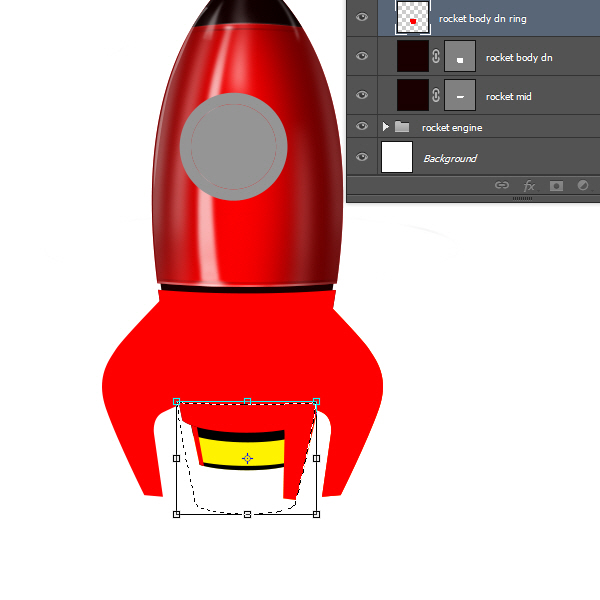
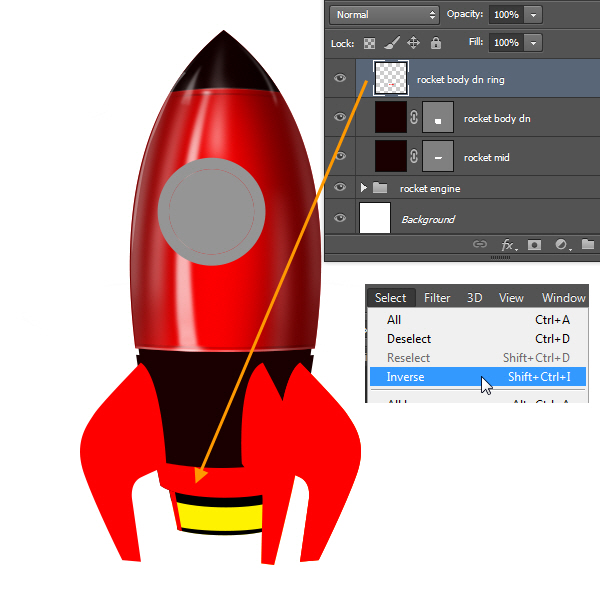
Then apply the selection by pressing ENTER key. Then from Menu > Select > Inverse to inverse the selection. Press DELETE key to delete the area. So now we have a new red color ring on top of the rocket body down shape. So why didn’t we create another shape layer for this? Actually we are creating shape layers for only major shapes. Because we could edit them in future if needed. But the rocket body down ring layer is not a major shape. So a normal pixel based layer is sufficient for this.
Step 42
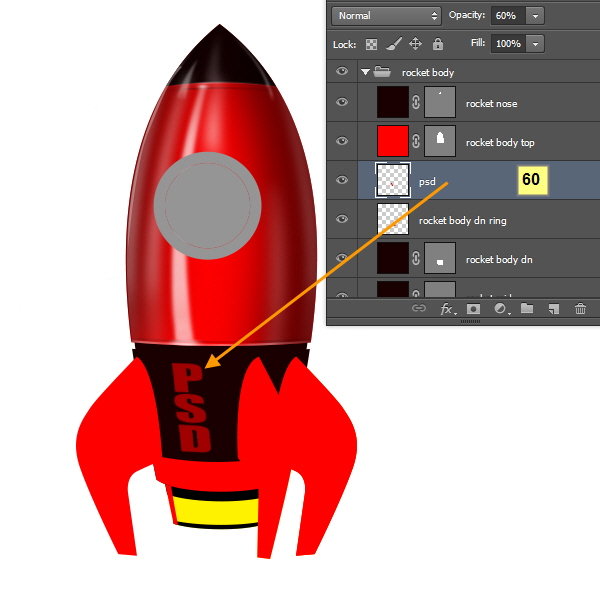
Now we will create some text, which will serve the purpose of logo on the rocket body down portion. Select the Type Tool and type some red (RGB 255, 0, 0) color text vertically. I first typed the letter “P” with Impact font and then duplicate the layer three times. You can press Control + J to duplicate layer. Then double click on the type thumbnail and change the letter. After that arrange the “S” and “D” layer vertically. Then select all three layers and rasterize them by right clicking on the selected layers. Then again right click on the selected rasterize layers and select Merge Layers. Press Control + T on this merge layer to get a bounding box around the merge layers. Now if you right click within the bounding box we will get the distort option.
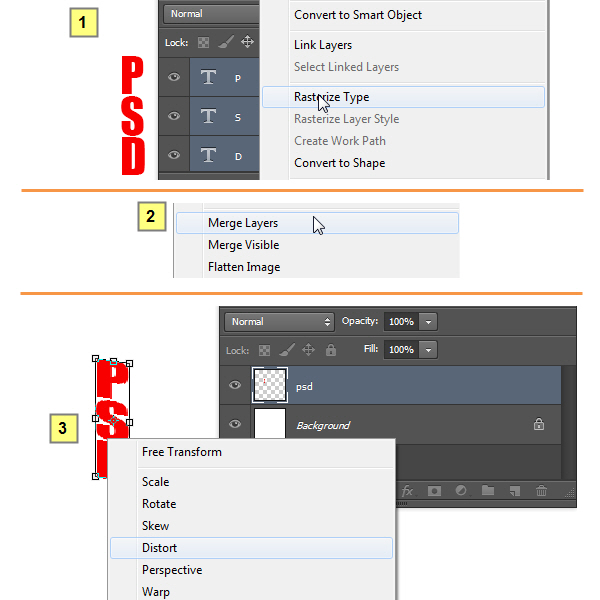
Distort by dragging the six handles (square shape) around the box to give the “PSD” a slightly perspective look. Press ENTER key when you are happy with the distortion. Similarly scale the “PSD” if needed. Change the opacity of this layer to 60%. Check screenshot for position and size.
Step 43
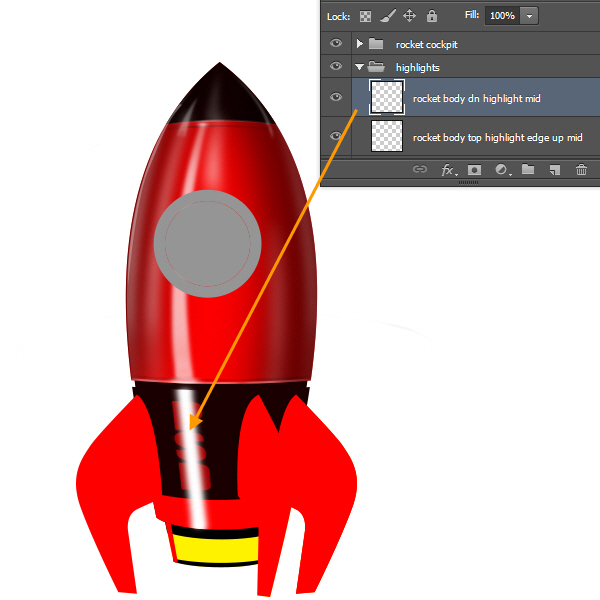
Now Control click on the mask thumbnail of “rocket body dn” layer to load selection. Then within the “highlights” layer group create a new “rocket body dn highlight mid” layer. Select a soft brush and paint a straight line from top edge to bottom edge. You can press Shift key for straight lines while using brush. Size of the brush should match to the lower edge of the white highlight shape of the “rocket body top highlight mid” layer.
Step 44
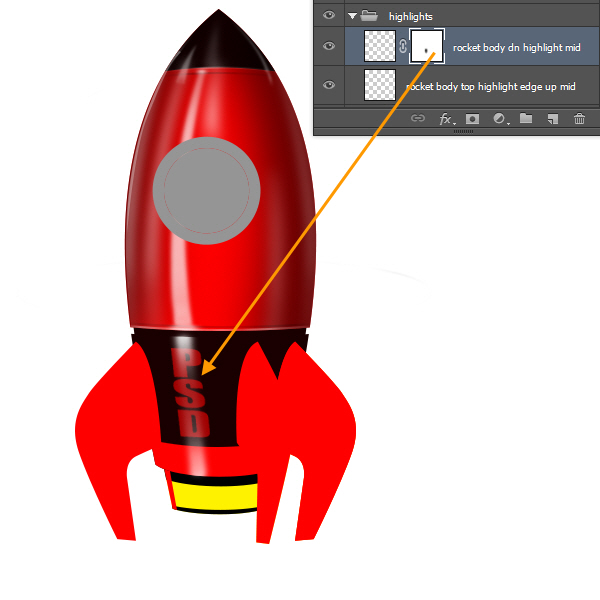
Add a layer mask to this layer and paint within the mask to match look of the below screenshot.
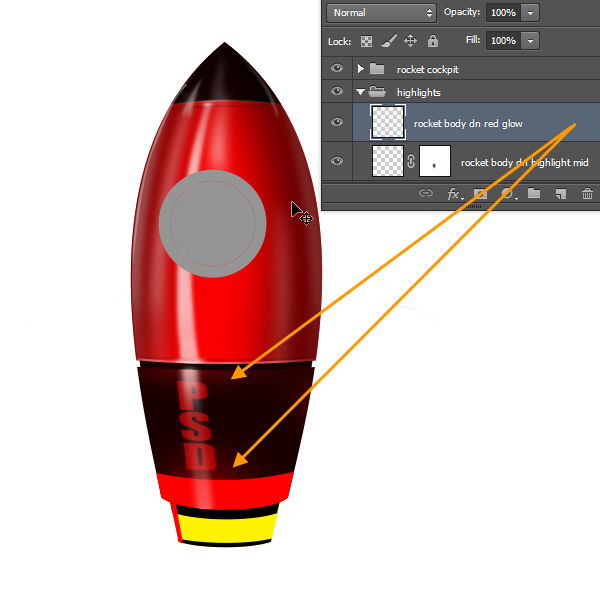
Step 45
Now turn of the “wings” group visibility by click on the Visibility Toggle icon (i.e. eye icon) at the left side of the layer group. Create a new layer with the name “rocket body dn red glow” within the “highlights” group. Then load the selection of the “rocket body dn” layer by Control clicking . Then back in the “rocket body dn red glow” layer with soft red (RGB 255, 0, 0) color brush with 30 – 50% opacity paint some red color glow using the screenshot below. This is basically the reflected red color from the wings and top body.
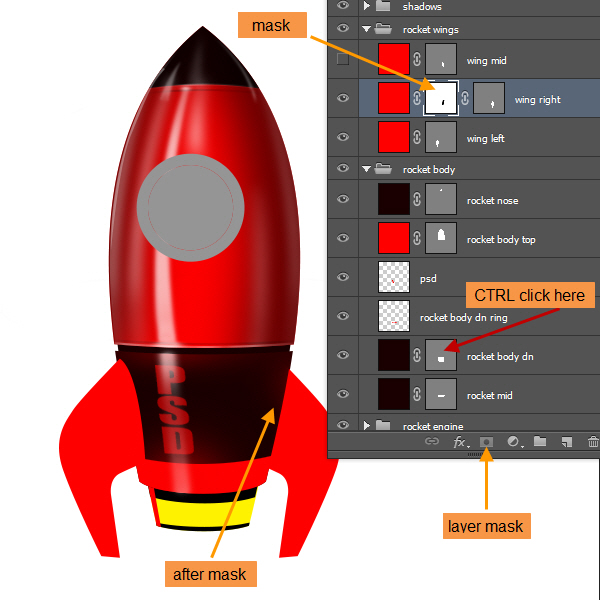
Step 46
We have a problem. Our rocket right wing is on top of the rocket body down shape. We have to hide the visible portion on top of the rocket body down shape with a mask. So go to “wing right” layer from within the “wings” layer group and add a layer mask. Yes we add another pixel mask on shape layer where there is already a vector mask (i.e. the vector shape). This is a great advantage of the Shape Layer. After applying the mask go back to “rocket body dn” layer and load the selection from it by Control clicking. Then come back to the “wing right” layer and click newly added mask thumbnail to activate it. Then with a black brush paint within the selection to hide the portion of the right wing, which is visible on top of the rocket body down shape. Below is the screenshot of the process.
Step 47
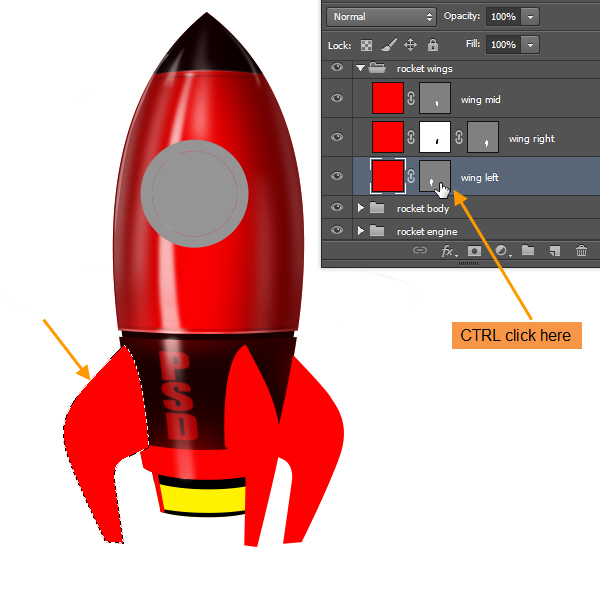
Next Control click to load the selection from the “wing left” layer from within the “wings” layer group.
Step 48
Then Menu > select > Contract. Use 6 pixels as the contract value.

Step 49
Then create a new layer “rocket wing left shadow” within the “shadows” layer group and fill the selection with black (RGB 0, 0, 0) color.

Step 50
Then add a layer mask to this layer and use screenshot as a guide to paint within the mask. Change opacity of this layer to 30%.

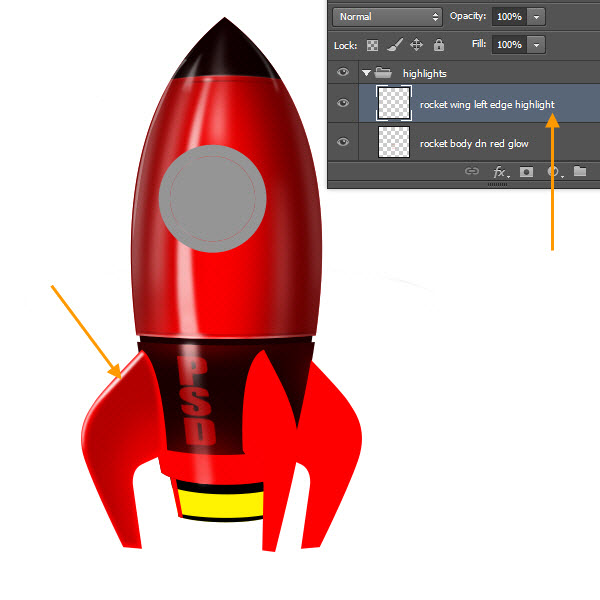
Step 51
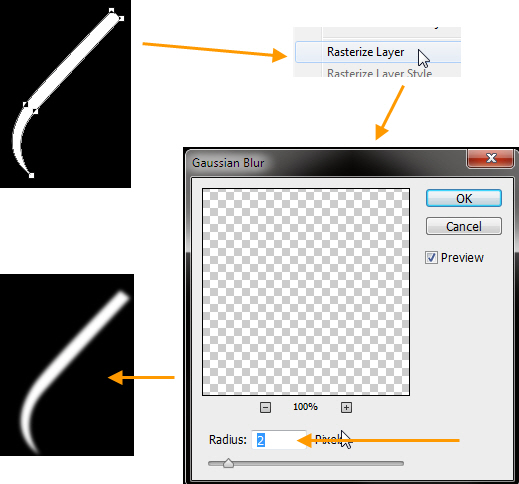
Next we will create a highlight on the edge of the wing. First we will create a new highlight layer with name “rocket wing left edge highlight” within the “highlights” layer group. Create the white highlight shape with the Pen tool and rasterize it. Then apply Gaussian Blur (2 radius).
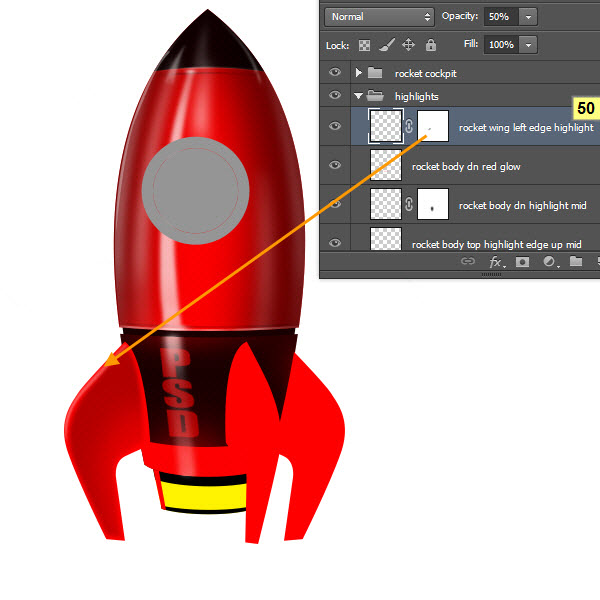
Step 52
Then add a mask on this layer and adjust like before. At last reduce the opacity of this layer to 50%.
Step 53
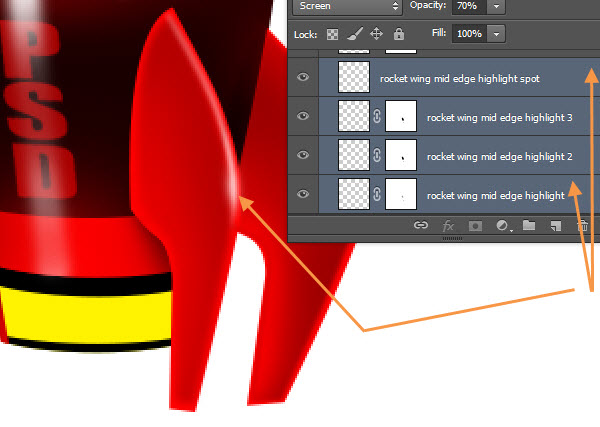
Duplicate this “rocket wing left edge highlight” layer twice with the names “rocket wing left edge highlight 2” and “rocket wing left edge highlight 3”. Opacity of these two layers will be 50% and 30%. Check screenshot for reference. The idea is to gradually build the highlight from low to strong effect.

Step 54
Let’s create a spot highlight on top of our previous left wing highlights. Create new layer named “rocket wing left edge highlight spot” on top of “rocket wing left edge highlight 3” layer. Take a small elliptical soft white brush. Remember in the Brush Panel, we can squash and rotate the brush tip shape, which we did previously. Click on center of the upper bended edge of the left wing one or two times. Check screenshot below. After that reduce the opacity of the layer to 70%.

Step 55
Follow the same process and create rocket mid wing highlight layers.
Step 56
Now create rocket right wing highlight layers with same process.

Step 57
Create a new layer on top of “rocket body dn highlight mid” layer with the name “rocket body dn highlight mid 2”. Follow the screenshot and create a highlight with the same brush based technique like before. Adjust opacity of layer.

Step 58
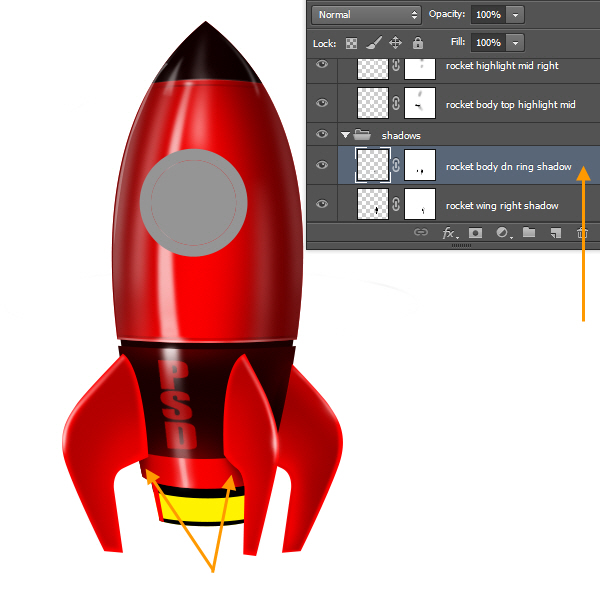
Now within the “shadows” group create a new layer at the top named, “rocket body dn ring shadow”. Then load the selection of the “rocket body dn ring” layer by Control clicking. Back in the “rocket body dn ring shadow” layer select a soft brush with black color and 50% opacity. Then paint to gradually build the shadow below the left wing and middle wing portions. Check screenshot for reference.
Step 59
Load selection form “rocket engine upper” layer. Then in the “highlights” group create a new layer named “rocket engine mid highlight”. Use same brush based technique and creates a highlight there. Change the opacity of layer to 50%.

Step 60
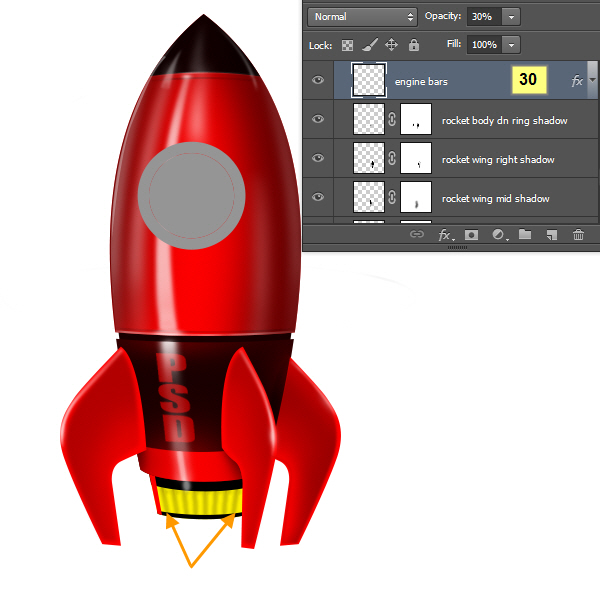
Control click on “engine mid” layer to select. Then create a new layer with the name “engine bars” within the “shadows” group. Select a 2 pixels soft black brush with 50% opacity and paint some horizontal lines. Again paint on top of these lines with the same 50% opacity brush. But this time not all the way from top to bottom. Stop painting at the approximate midway. So the lines are coming down from top strongly and then slowly reduce their strength. You can do this in another way also. First paint lines with 100% opacity brush and then fade with a soft Eraser with 50% opacity from the bottom to top strokes .These line will serve the purpose of some ridges. Below is the screenshot.

Step 61
Next we will add a Outer Glow layer style to this “engine bars” layer. Double click on the “engine bars” layer to open the Layer Style window. Check screenshot for Outer Glow settings.

Reduce the opacity of this layer to 30%.
Step 62
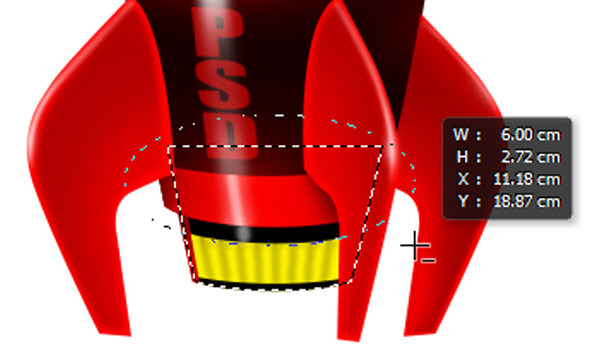
Select “engine mid” layer by Control clicking.

But we want to paint within the visible portion of the “engine mid” layer. So we have to exclude some portions from this active selection. You can add or subtract areas from an active selection by pressing Shift (add) or ALT (subtract). Here we want to subtract areas from the active selection of “engine mid” layer. Selection of layer “engine mid” still active, Select the Elliptical Marquee Tool. Then press ALT key and drag a selection covering the upper portion of “engine mid” selection. Notice the minus (“-”) sign below the Elliptical Marquee Tool icon, indicating that you are in subtract from selection mode.
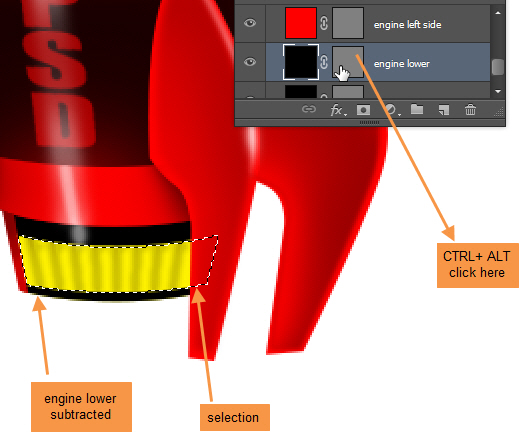
Then Control + ALT click on the “engine left side” shape layer’s mask thumbnail.

Next Control + ALT click on the “engine lower” shape layer’s mask thumbnail.
Next Control + ALT click on the “wing mid” shape layer’s mask thumbnail.
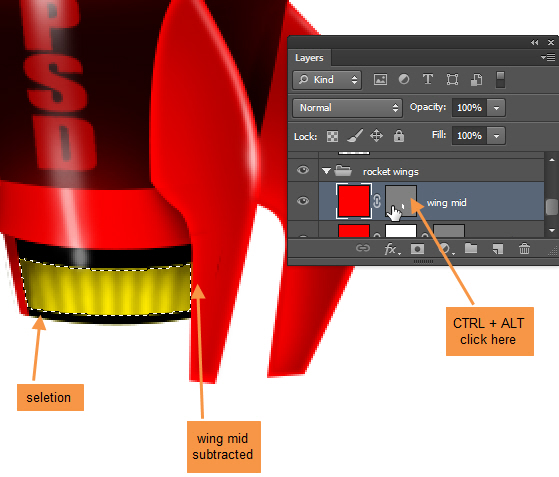
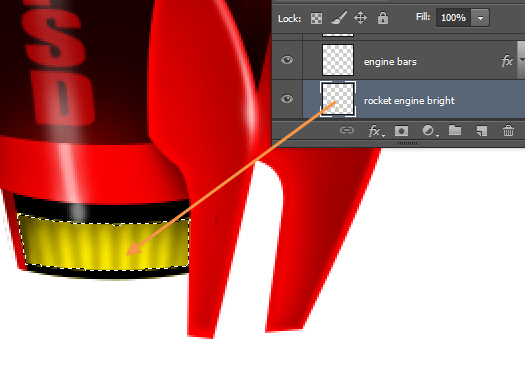
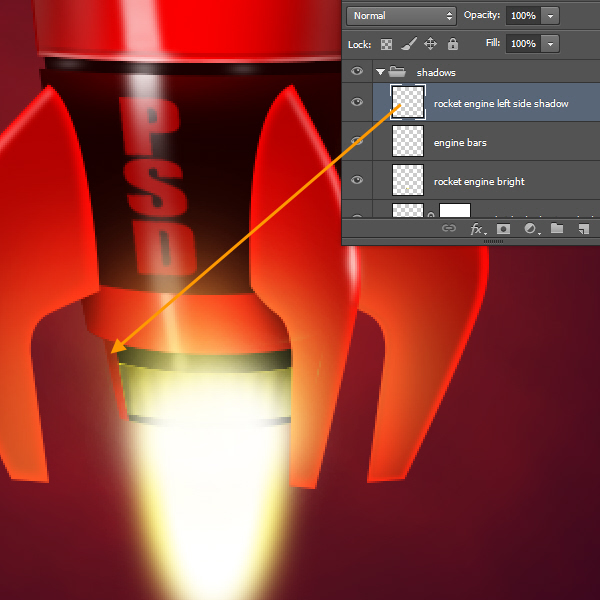
So only the visible area of “engine mid” is now selected. Now within the “shadows” group create a new layer named “rocket engine bright” below the “engine bars” layer. Paint in the middle of the area with RGB (253, 232, 0) and around the top and side edges with RGB (74, 61, 0). The objective is to create a bright lower middle part and darker sides. Take a look at the screenshot below but exact match is not important here.
Step 63
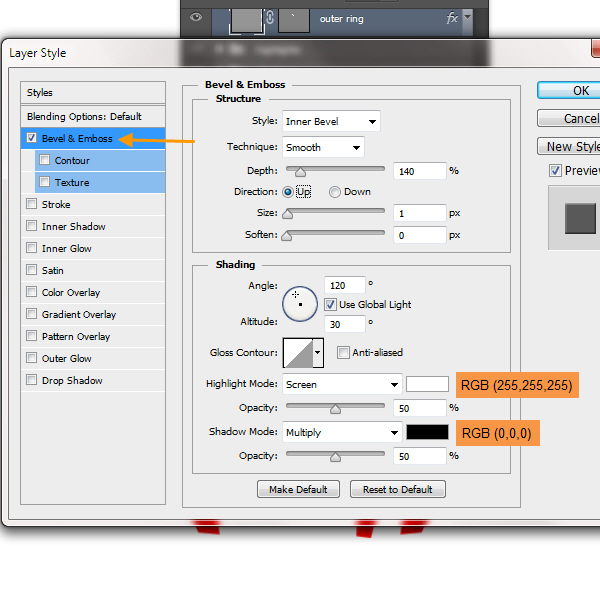
It’s time to start with the cockpit portion of the rocket. The good news is, cockpit is the easiest part. Mostly we will use Layer Styles and then a little manual adjustment. We will start with the “outer ring” layer. Double click on the “outer ring” layer to open the Layer Style. First, is the Bevel and Emboss settings.
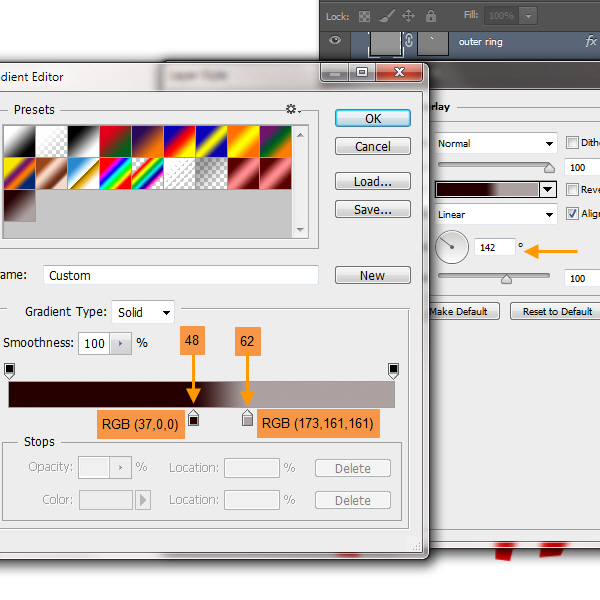
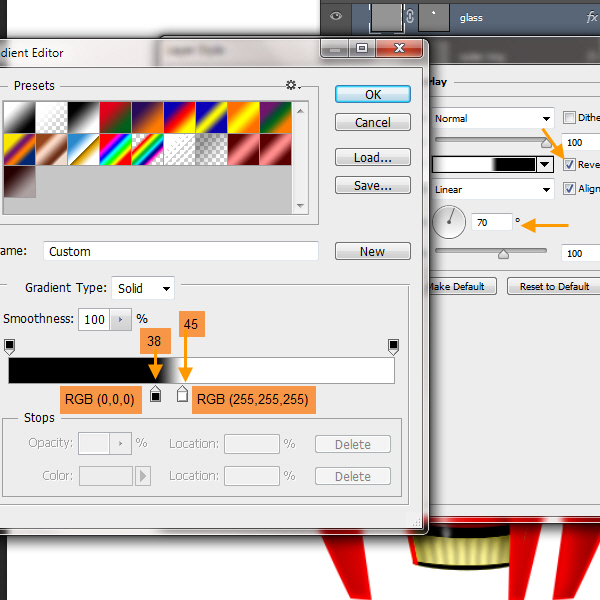
Gradient Overlay settings. Click on the Gradient Bar at the right side to open the Gradient Editor.
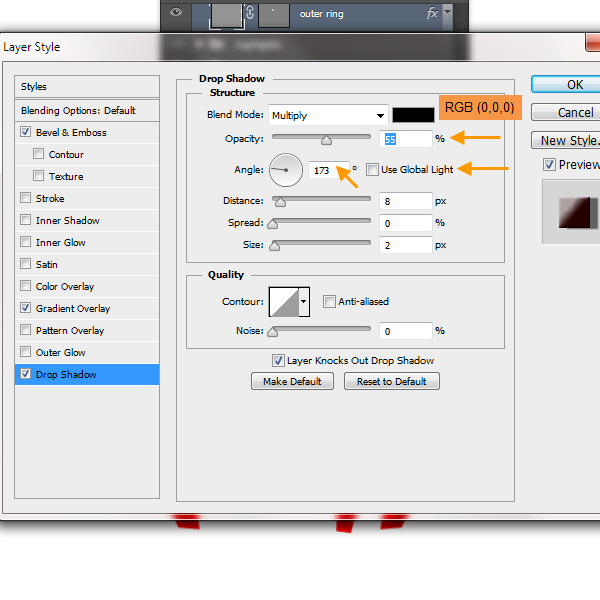
Drop Shadow settings. This completes the outer ring.
Step 64
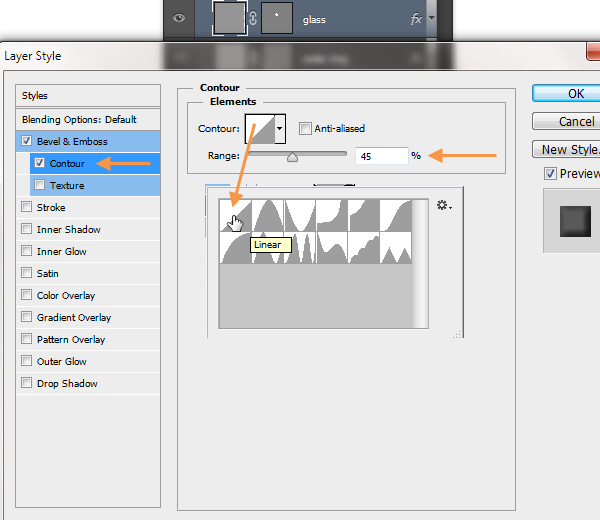
Next is the “glass” layer. Here is the Bevel and Emboss settings.

Bevel and Emboss Contour setting. Click on thumbnail besides Contour text to open Contour picker and select Linear.
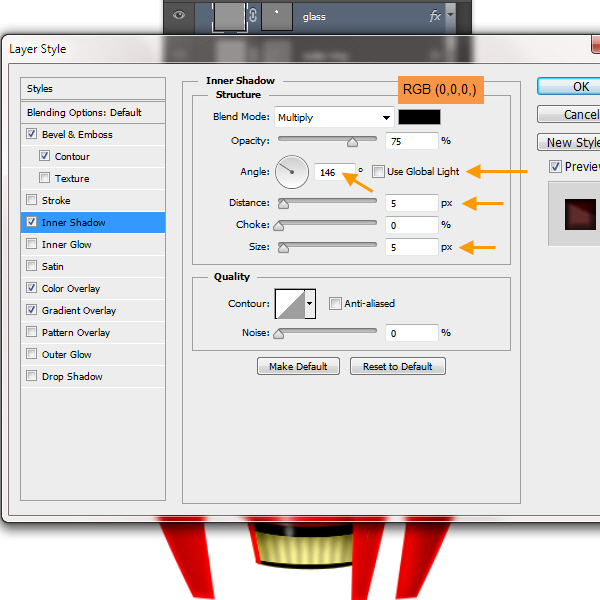
Inner Shadow settings.
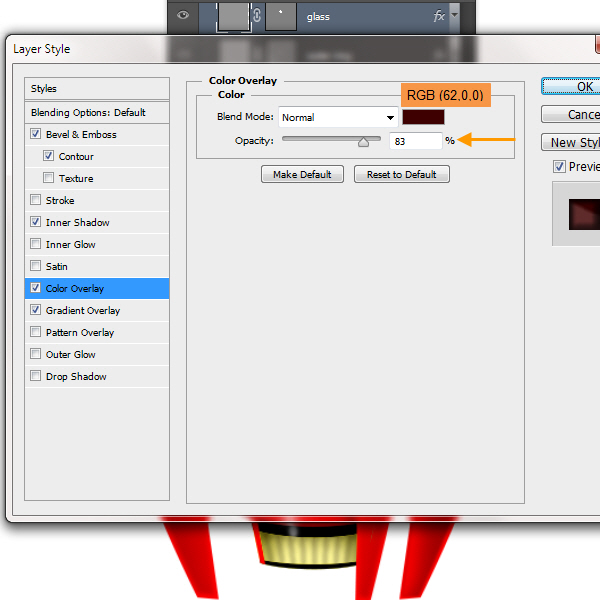
Color Overlay settings.
Gradient Overlay settings. This completes the glass.
Step 65
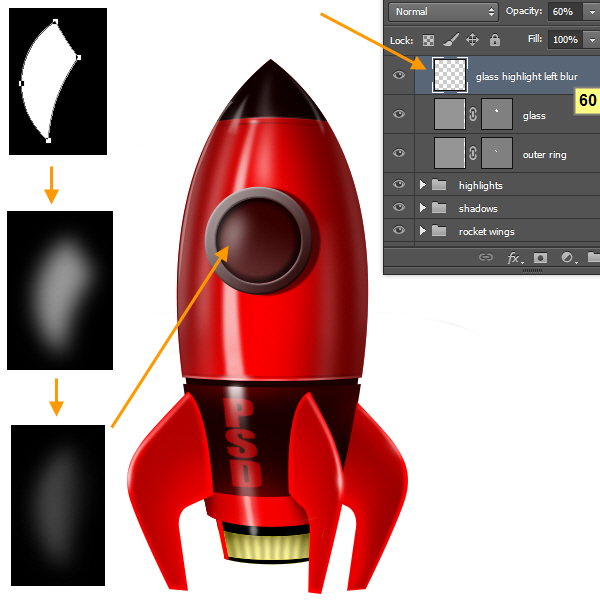
We will keep all cockpit related layers within the “cockpit” group. So on top of “glass” layer create a new shape layer named “glass highlight left blur”. This will be a crescent shape filled with white (RGB 255, 255, 255) color. Then Rasterize it, apply Gaussian blur and finally select a soft Eraser with 50% Opacity to erase and blend some part. No need to create mask here as we will never need any further edit on this one. Even if you want, you can create the highlight shape with a low opacity soft white brush also. Feel free to experiment with it.
Step 66
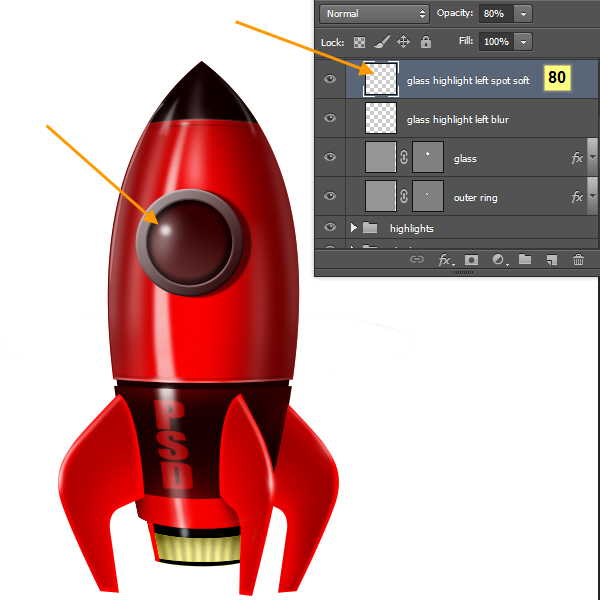
Create a new layer named “glass highlight left soft spot” on top of “glass highlight left blur” layer. Select a soft white brush with small radius and paint the small soft highlight on top the previous blur shape. Reduce layer opacity to 80%. Check screenshot for reference.
Step 67
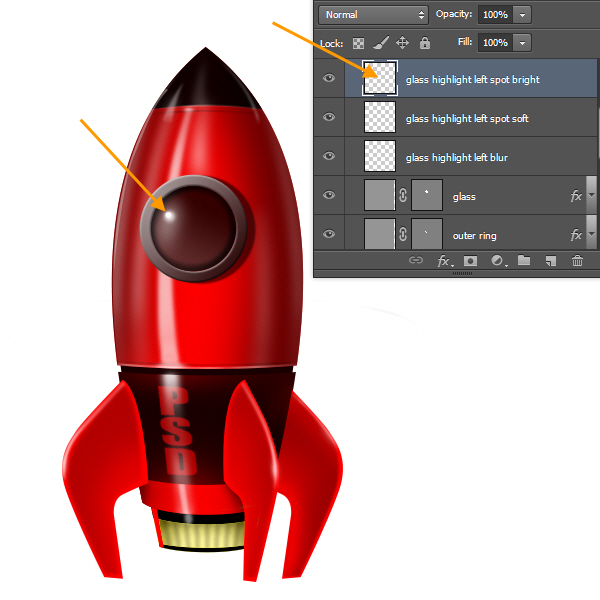
Now create “glass highlight left spot bright” on top of the previous layer. This will be the bright highlight spot visible on very shiny surfaces like glass. You can change the brush bigger or smaller by pressing the “[” and “]” keys. Change your brush size to smaller than the previous soft spot size. Hardness should be 50 – 70% not 0%. Then create the brightest of the glass highlights. Below is the screenshot.
Step 68
Now look at the glass. The inner portion of right side of the outer ring should have a reflection on the right side of the glass. First Control click on the “glass” layer to select, then create a new layer named “glass refl right” on top of “glass highlight left spot bright” layer. Then press “D” key to change foreground and background colors to default black and white. Now press “X” to make white as your foreground color and fill the selection with ALT + BACKSPACE keys. So we have a white circle now. Again Control click on the “glass refl right” layer to select. Select any selection tool and RT click within the selection to get the Transform Selection option. Scale up the selection by clicking and dragging on any corner handle. You can also press Shift and ALT while you are dragging to constrain the selection shape. Press ENTER to apply selection. Now move the selection towards the left side a little by pressing the left arrow key. Change your tool into the Move Tool (V) and then press DELETE key to delete the left side. So we end up with a crescent shape.

Apply 2 pixels Gaussian Bur and reduce the opacity of the layer to 20%. Glass reflection complete.

Step 69
Next we will create a series of screws for the outer rings. Create a new layer on top of “glass refl right” layer. Select the Elliptical Marquee Tool (M) and drag a small perfect circle by pressing Shift in this layer. Then fill the selection with black color and deselect by pressing Control + D. Position the circle in the middle of the width of the top part of the outer ring. Then duplicate this layer and position the new circle similarly in the lower part of the outer ring. Then Shift click to select both screw layers and duplicate these two layers together. Now press Control + T while this two duplicated layers still selected. Then RT click within the bounding box and select rotate. Press Shift while rotating to rotate 45 degree incrementally. Now we have four screw layers. Select all of them then duplicate all four layers. Four newly duplicated layers still selected, rotate 45 degree by Shift rotate. We have perfect circle of screws.
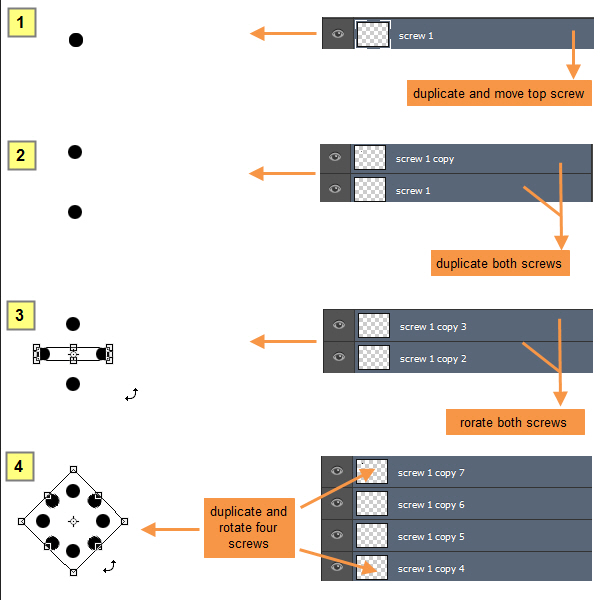
Select and merge all these layers and rename the merged layer to “outer ring screws”.
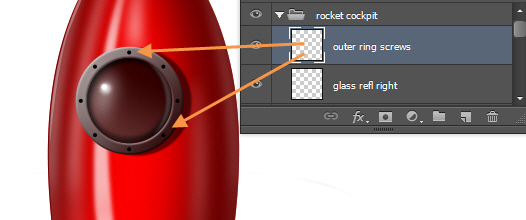
Step 70
RT click on the “outer ring screws” layer to open the Layer Style window. Apply the following Drop Shadow settings:

Outer ring screws after layer style.

Step 71
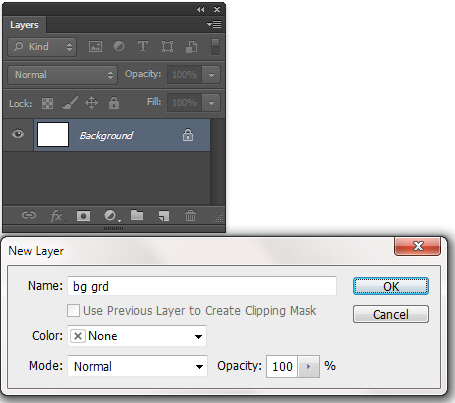
Double click on the Background layer and in the next New Layer window type “bg grd”.
Then apply the Gradient Overlay settings.
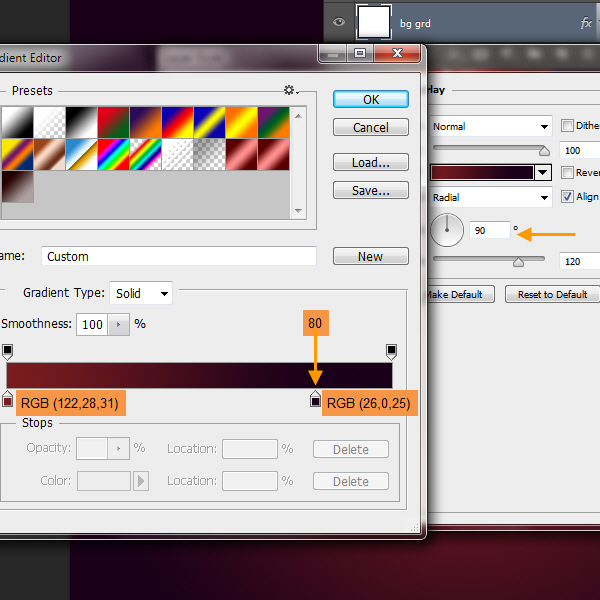
Layer “bg grd” after layer style.
Step 72
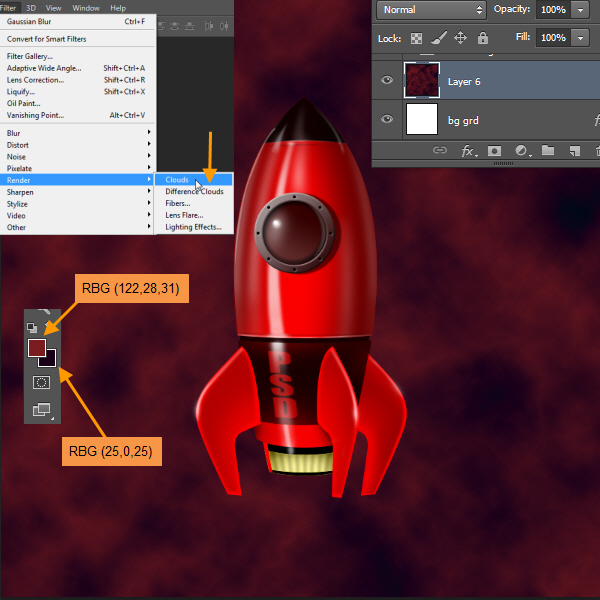
Change your Foreground and Background colors to RGB (122, 28, 31) and RGB (25, 0, 25) respectively. Then create a new layer on top of “bg grd” layer. From Filter > Render > Clouds. Apply then press Control + F to reapply couple more times. Clouds filter generates random cloud pattern with each application. Stop when you like one particular pattern.
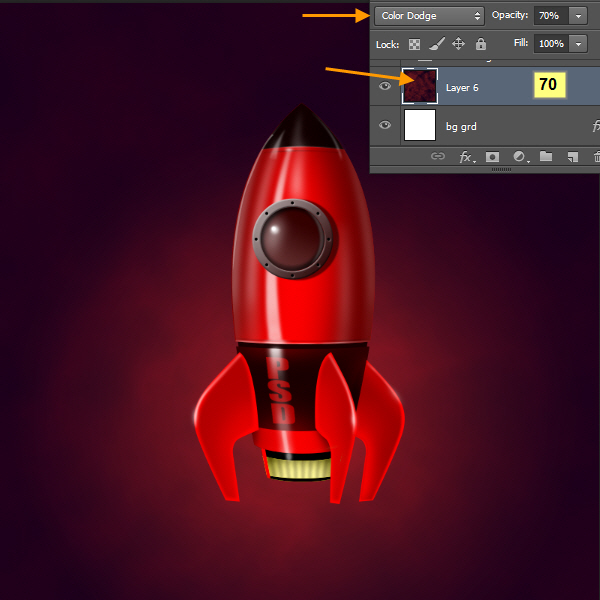
Then change the layer blend mode of this layer to Color Dodge. So cloud pattern is now prominently visible in the lighter parts only. Change layer opacity to 70%.
Step 73
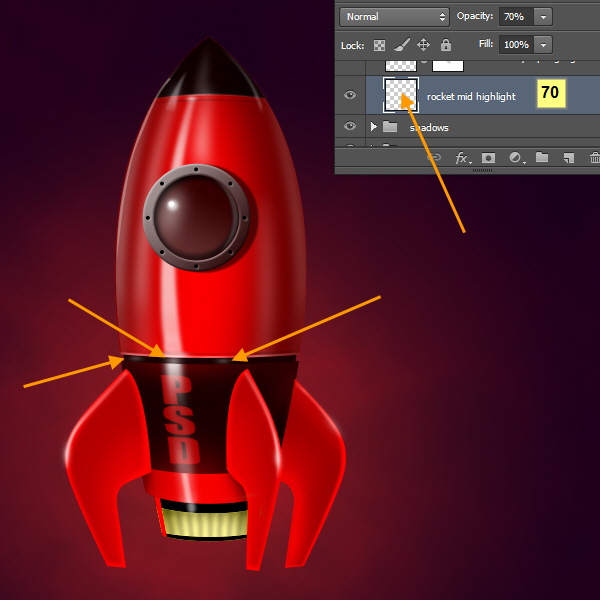
Select “rocket mid” by Control clicking and then create a new layer within the “highlights” group with the name “rocket mid highlight”. Select a soft white brush with low opacity. Then create three subtle highlights like the screenshot below. Change layer opacity to 70%.
Step 74
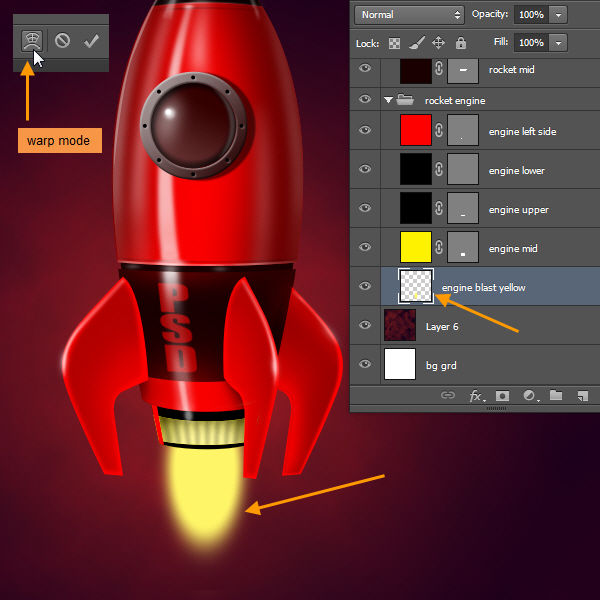
We will create the engine blast now. We will create the engine blast from brush. Select a large yellow color soft brush. Then reduce the Roundness value from Brush Options (F5) to make it look more elliptical. Click once to create a large elliptical shape. Then Edit > Transform > Warp or press Control + T and click Warp from the Options Bar on top. Check screenshot.
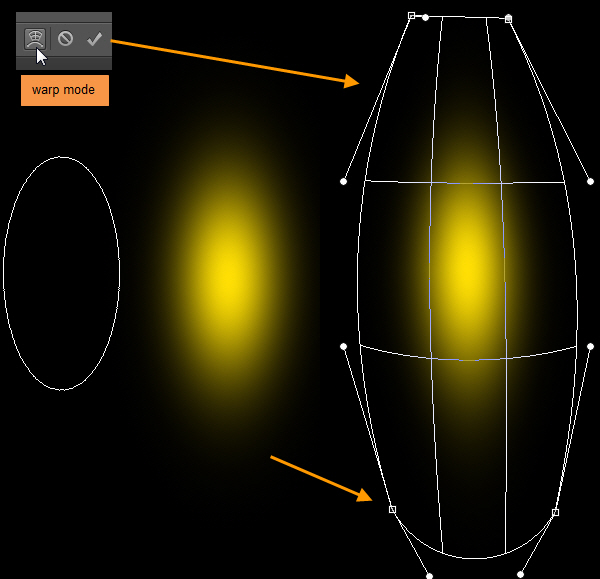
Expand the “rocket engine” group and create new layer named “engine blast yellow” below “engine mid” layer. The width of the brush after roundness reduction should match the width of the lower portion of the “engine lower” layer shape. Click on the “engine blast yellow” layer to create the engine blast. More or less half of the brush should be hidden below engine part.
Step 75
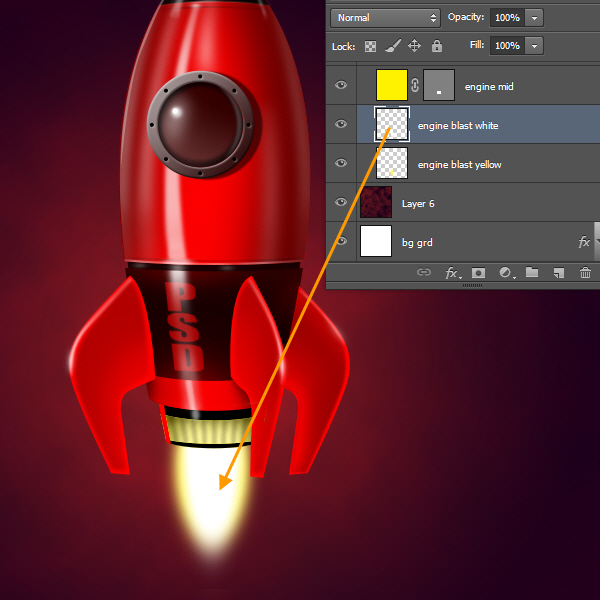
Create another layer on top of “engine blast yellow” named “engine blast white”. Change the color of the brush to white and reduce the size by pressing “]” key. Then click to create white elliptical shape on top of the previous yellow shape. Use Warp mode to stretch the lower portion of the white brush below the yellow brush shape.
Step 76
Let’s create the engine glow now. Within the “highlights” group create a new layer named “rocket engine glow mid”. Select a 30% opacity soft brush with a pale yellow color. While you are using brush, if you press ALT key then Brush Tool will temporarily change into Eyedropper Tool. In this temp mode you can also select color from the bright colors of the engine blasts. Basically you click more with the brush right on top of the blast area, but click less when you are going away from the blast area. Below is the screenshot for reference.

Step 77
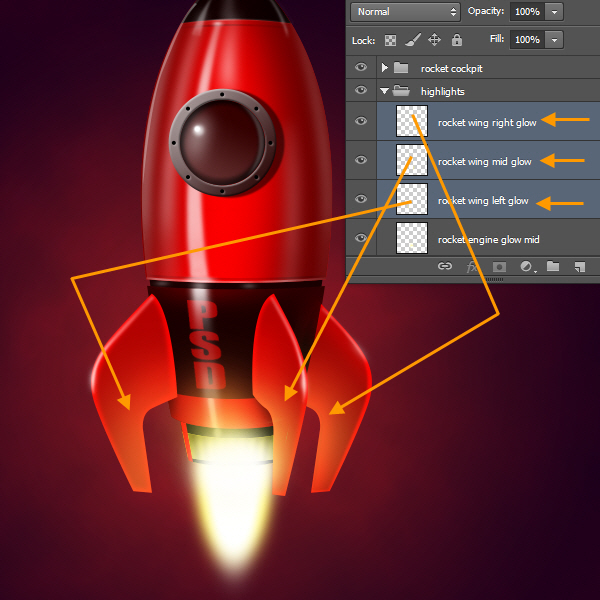
Now create three more layers on top of “rocket engine glow mid” layer, namely; “rocket wing left glow”, “rocket wing mid glow” and “rocket wing right glow”. Use same technique like “rocket engine glow mid” layer and complete them. Just remember that the glow amount of three wings will be little less than the “rocket engine glow mid”. Check screenshot below.
Step 78
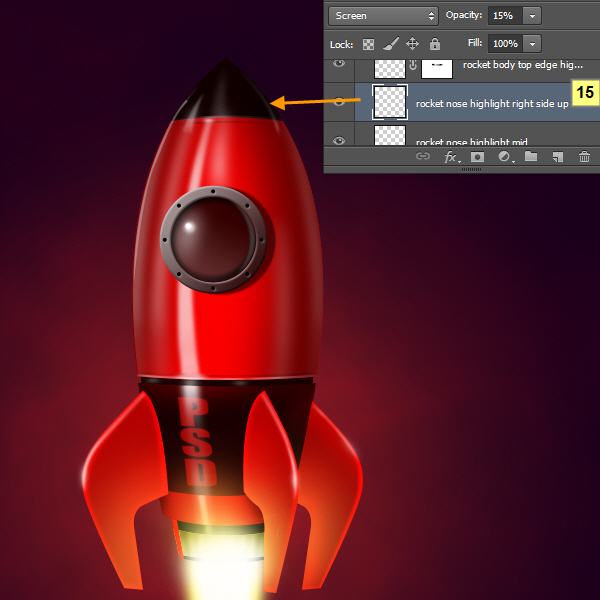
We need to adjust the opacity of “rocket nose highlight right side up” a little. Now surrounded by dark background its looking somewhat strong. So reduce the opacity of this layer to 15%. So what’s the point of coming back and do this now? I just want to show you that things will look different based on their changed surroundings. So feel free to adjust here and there if you want. But before that let’s complete what we are doing. Because we are almost there!
Step 79
Let’s check the lower part of the engine. In the blast area if you check “engine left side” closely you will probably find it a little flat looking. Though the bright glow is there, but still we need to add a little shadow here. So Control click to select “engine left side” layer and then within “shadows” group create a new layer on top named “rocket engine left side shadow”. Select a small soft black brush with 30% opacity and paint a little shadow closer to the upper portion of the below the “rocket body dn” shape. You can exclude the “rocket body dn” layer before painting to help you more with the previous subtract from selection technique.
Step 80
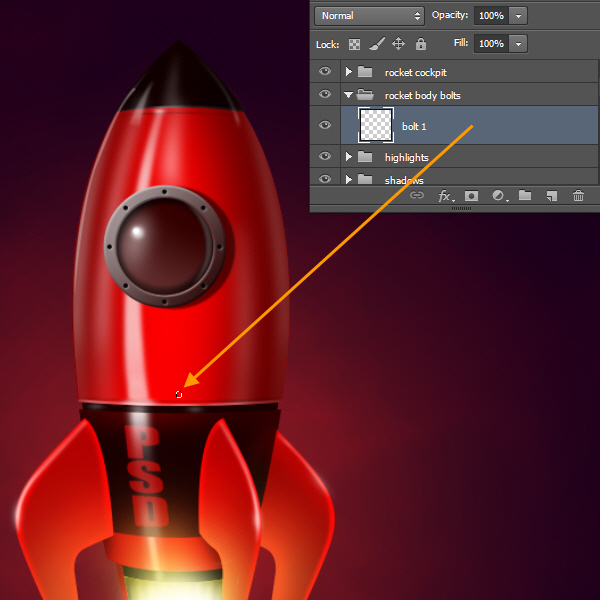
We have to create the bolts on rocket body top now. But here we will create the “rocket body bolts” layer group first then create the layer within it. You can create layer group before layer also. So create the new “rocket body bolts” group below the “rocket cockpit” group. Then “rocket body bolts” group selected create a new layer by pressing Control + Shift + N. In the New Layer window type “bolt 1” in the name field. With the Elliptical Marquee tool create a small circle on the middle portion of the lower edge of the rocket body top shape. Fill the selection with red color.
Step 81
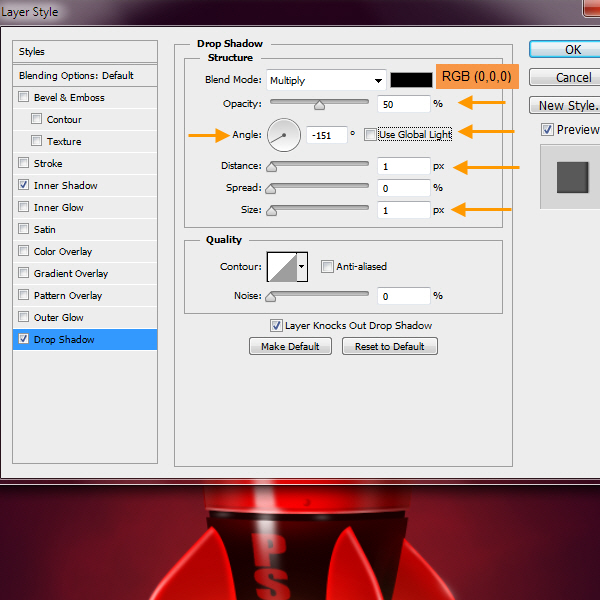
We will create two Layer Styles: Inner Shadow and Drop Shadow for the bolt. Below is the Inner Shadow settings.

Drop Shadow settings.
Step 82
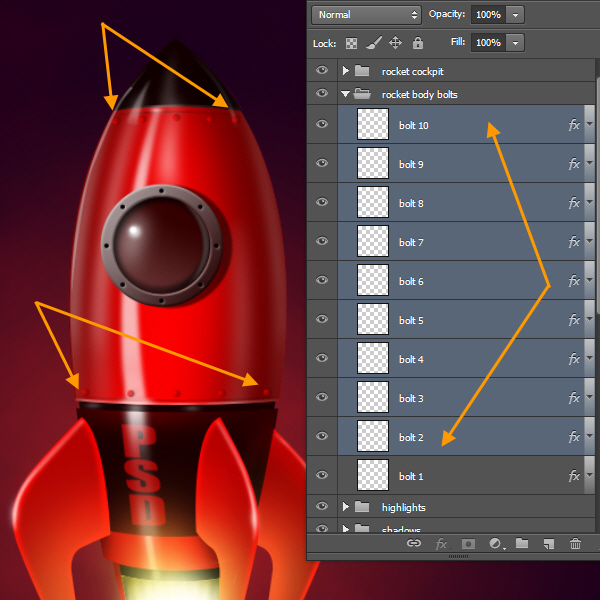
Now duplicate this “bolt 1” layer multiple times and arrange like the screenshot below. We will create two series of bolts: one upper and one lower.
Step 83
Then create a new layer within the “highlights” group with the name “rocket body bolt highlights”. Then resize a soft brush matching a bolt size and select white as brush color. Then click on top of each bolts to create the highlights.

Then reduce the layer opacity to 40%.
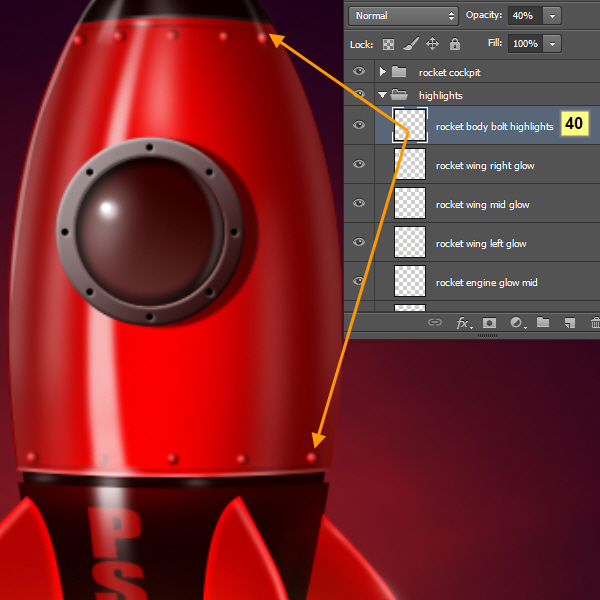
Step 84
Now the white highlight of the “rocket body top highlight mid” layer is hiding one lower row bolt. So go to “rocket body top highlight mid” layer and take a soft 30% opacity black brush to paint within the mask of that layer to reveal some portion of that hidden bolt. Check screenshot below.
Step 85
Rename the layer with the clouds pattern on top of “bg grd” layer to “cloud”. That’s it! Below is the final layer order.

Congratulations, You’re All Done!
Awesome job making it this far! You should be proud of what you’ve created. Show it off to your friends and colleagues and get some feedback.
You can also comment here with your version, or any questions you had about the techniques used. We love to see what you guys create and we’re always here to give helpful feedback and tips to help you to improve.
The source files for this tutorial are available to our FanExtra members community. If you want to access the source files for this tutorial (and all of our tutorials + thousands of other resources) then sign up here.
If you’re already a FanExtra member then you can login here to access the source files.

0 Comments